What drawing easy is about.

Let me tell you of some ways, that you can use, to do your drawing easy, there are a number of different ways, you can do this, one of them is, by keeping your drawing to a minimum.

Perhaps we can call this, the minimalist KISS method, Keep It Simple Stupid-KISS.

Minimalism, is an art form in its own right, just in case you didn’t know but in my brain, I most often consider, that less is more and without getting into any deep philosophy, on this, I often feel that simple is best.  The process used, for all drawing is, construction through sequential building blocks, with each being a step, to the next and so on, to completion.

When shading a drawing, you can keep it to a minimum, by using, the white of the paper, as much as possible and only shading, the darker areas, so as to reduce the amount of work needed, in doing all of the detail. This can be very effective, producing some nice drawings, that are in a style called chiaroscuro, where there are strong contrasts, between light and dark. These where often practiced, by drawing statues and plaster busts, which would be, very light in tone because they would often, be white in color or very near white, making it easy, to keep the shading, to a minimum, only emphasizing the darkest tones.

To make drawing easy, we need to reduce, the amount of steps we take, to get to an end result, so we can do this, in a number of ways. Reduce the drawing, down to use a minimum number of marks, in order to make the drawing more simple. This can be accomplished by making line drawings and examples of this, can be seen in, cartoon type drawings, Bart Simpson, Mickey Mouse characters, are just a couple but there are probably, thousands of others, meaning that simple is just as legitimate, as the complicated.

Another method is tracing because it will reduce, the time spent, on doing a construction drawing and reduce the drawing, to only be made up, of simple lines. This can be a big saving, depending on how much you know or understand about it and your ability, because somebody, who is good at drawing free hand, by sight drawing, can sometimes, draw faster, than they can trace, some drawings. Tracing is also, a very good tool for learning to draw and is, I consider, largely undervalued, under exposed and practiced by many, if not all professionals because when, you do drawing, as a job of work, time is money.

The key to drawing easy is, to keep it simple, less is more because if you consistently draw, in ways that are simple, the harder ones, get easier, as well.

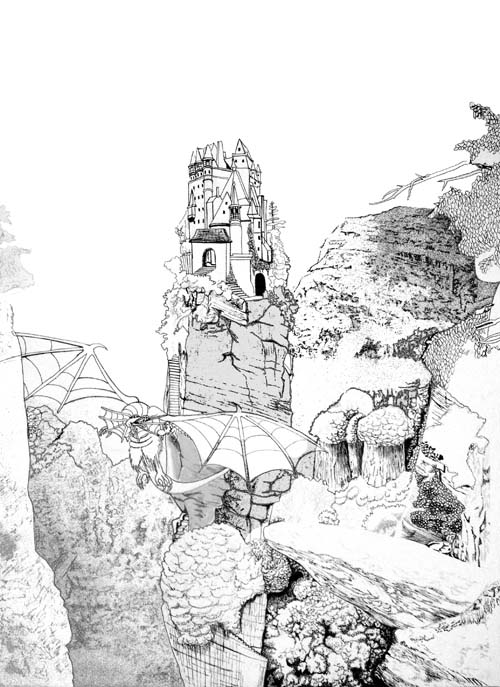
 

what drawing easy is about in dragon time, pen and ink.

Drawing lines or line drawing what?

Drawing lines, is not quite as simple, as you might think because the weight and thickness, of the lines we make, have an impact, on the effectiveness of our drawings, to add to this, is the hardness of the line, which I will explain later, is also of importance.

The meaning to thickness of line, should in essence be obvious, it means what it says, how wide or narrow, the line actually is, has an impact, on how our brain, relates to that line in context, of what is surrounding it and the tonal value of the line, also has an impact, on what is seen, when I say tonal value, I am talking about how light or dark, the line is in tone.

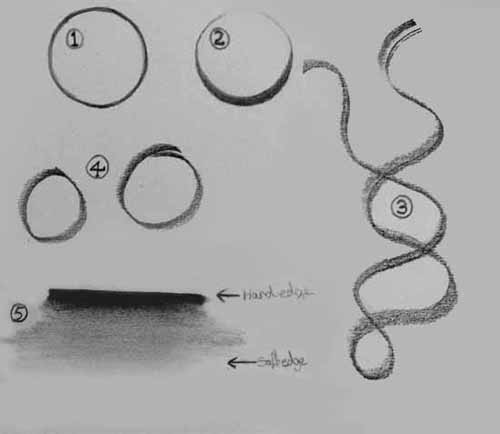
If you draw a circle, with a wider, darker line along the bottom area, it will look like it is, the bottom of a sphere and will start to look like, a ball shape, rather than, simply just, looking like a circle. This also gives, the bottom half of the circle or sphere more weight because the wider line, is more substantial, especially, if it is also darker in tone, it will attract the eye, giving more emphasis and importance, to it, this also creates the illusion, of light and shadow, that is often used, to emphasize, the under areas of shapes, we draw, suggesting, the shape, is three dimensional.

Please take a look, at the drawings, of the two circles, 1 & 2 below, to see an example of what I am trying to explain, also take a look at, 3 & 4, these lines and circles, have been made with a 5 mm, a half cm, flat pencil, notice how the line varies in width, giving it the look of a twisted ribbon. Number 5, shows, how lines can go, from a hard, definite edge, to a more subtle, less definite edge, that can be used to great effect, in your line drawings.  These different types of line, can be used to create light and shadow, so as to suggest the illusion of form and shape but still maintaining, the quality of being a line, using this, within your line drawing, can start to bring, your line drawings, to life.


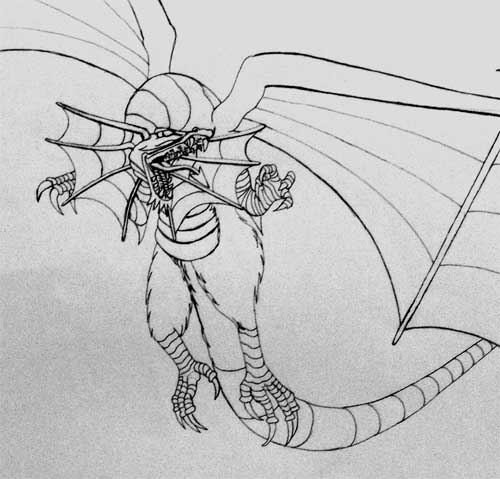
Image of different line types numbered to help.The dragon drawing below, was created with pen and ink, it puts very little emphasis on line quality, it is a line that is consistent, in thickness, giving little or no quality, other than just being a line but even so, it does create the image of a dragon, through the use of drawing lines, with nothing more.

Quick bsic drawing of dragon outline.

Easy pencil drawings.

This will explain about how to do easy pencil drawings.

Easy pencil drawings are achievable, if you break it down, into the two main components, of making a good pencil drawing, these are the construction or outline and the shading.

Most people find shading easier and more relaxing, than constructional or outline drawing but the problem is, you can’t do the shading unless, you have done the outline first. This makes drawing difficult, for most people and so they never get to enjoy, doing the shading because they give up, before they have completed the outline, and it’s a pity.

Easy pencil drawings, can be achieved, it dose not have to be difficult because you can trace outlines and get them right every time.

People will say, that tracings are no good, as drawings because they are uninteresting, if they are just tracings and boring. I will agree with this but if you are, then going to complete the drawing, by doing the shading, then this is different, very different. For a start, by learning how to do easy pencil drawings, you will enjoy, your drawing more. You will find it easier, you will find it more relaxing, you will create better drawings, you will not take as long, in doing it, plus you will still learn about construction and proportional representation, the easy way.

If you learn to draw, by doing easy pencil drawings, in this way, you will also improve, in all those more difficult areas, of construction drawing, that hamper everyone’s progress, when they try to draw freehand, by sight drawing, which is drawing, by just looking. Sight drawing is the most difficult way to draw, of all drawing techniques, so it is little wonder, most people say they can’t draw because everybody try’s to draw, by sight drawing, when they start out, it’s not a good idea really. The fact is that nobody draws, by just looking, even when sight drawing. Sight drawing is just, a more difficult way of tracing, all drawing is done by measuring, comparing and struggling to get it right, making mistakes, and trying to hide them or erasing them, making your drawings and pictures messy. Learn to draw by doing easy pencil drawings and you will find that, the results turn out to be much better and a lot less messy.

Let me tell you a fact, I used to spend hours, constructing outline drawings, of portraits for people and make a right mess, most of the time. Then I used to trace that drawing, to get the outline, onto a clean drawing area, to do my final drawing, I had no choice because people want copies of photographs, not drawings, that look like drawing, nowadays. Today people want, photo realistic drawings, they want them to look like photographs, not drawings and they do not want, to sit for you, either.

So I stopped doing it the hard way and started doing easy pencil drawings. I traced the outlines from photographs to save myself at least half of the work. I was told it was not good to do this but that was what I was doing anyway but taking twice as long. I was told, my other drawing skills, would diminish and I would become less able to draw, without tracing but do you know what, it is not true because it is more enjoyable, it is so much better but I still become aware, of important learning.

Below you will find a video, of me drawing Kurt Cobain, who was once the lead singer and guitarist, with the Grunge Rock band, Nirvana. Please notice that I am not tracing and it is here, just to prove, that tracing does not take away, from your ability to draw. Perhaps I am unique and it only works for me but I don’t think so, I am just like anybody else, who likes drawing, who got good at it, through finding ways to do so. I am sure you will also by doing easy pencil drawings.

The truth is this, I got better, much better because I enjoyed it, so much more, doing easy pencil drawings but I still became aware, of the important learning, as well.

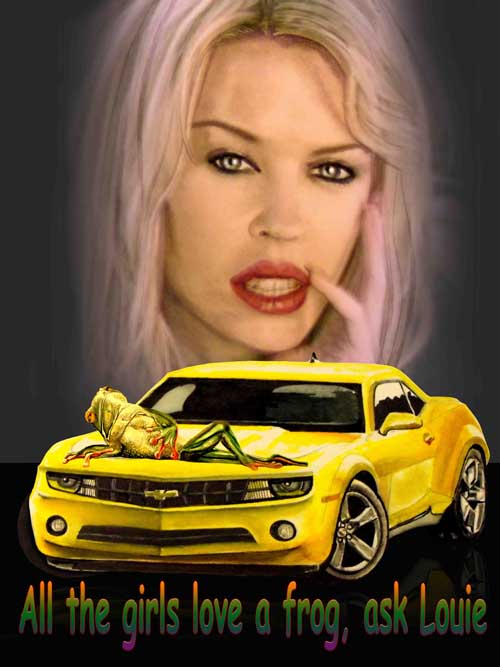
A picture of a car, a frog and a girl.
Louie, found on the Stumble Upon, website and lightly traced from my monitor screen.

Do you know what, you need to do easy pencil drawings first, then as you get better, you can develop, the other ways, that improve your sight drawing, when you understand it better.

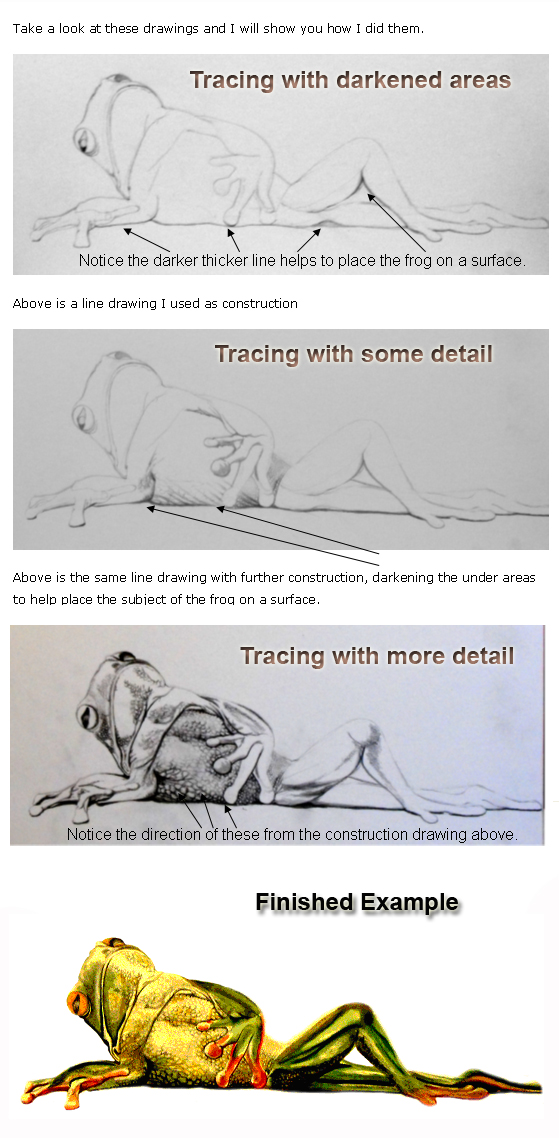
easy pencil drawings a progresive drawing of a frog.
Easy pencil drawings, progressive drawings of a frog, tracing taken, from an image found online, to show you, how to draw easy.

Make speed drawing videos.

You can do this, with video off your mobile phone because speed drawing/speed painting, are not anything of the like, they are speeded up video, nothing more but you knew this, didn’t you?

To do this, you video record yourself, drawing a picture but you can take two weeks, if you want and just do ten minuets, every day, I did my first recording, with a digital camera, that would only recorded, ten minuets at a time. It was a lot of work because I had to capture the film from the camera, every time, so I could take another ten minuets, it worked and I was very pleased with the result.

If you are interested, then you can see the video (Watercolor painting of Snowdon the highest mountain in Wales, UK.) by clicking the link and I hope you enjoy it, I did.

If you have Windows Move Maker, on your PC, then you can use it to capture your video and edit it, for distribution to any of the online video networks, for a little effort really, when you think of the possibilities of getting it seen.

Just in case, you don’t know but online video, is the biggest thing since television, we can pull this information because we want it, all of us and we do all the time, online video is here, right now, use it.

Editing with Windows Move Maker, on your PC, is easy, it is not the best but it is more than adequate, for making online videos, it just takes a little effort to do so but let me tell you, they all do, even Adobe Premier, in fact it’s worse.

The biggest problem is perhaps getting music for your video, everybody has a copyright but not any more because you can take our music and sounds, if you want to, just record them with Audacity, free software, easy to use.

If you do a quick search for Audacity you will find it easy.

If you have any questions just ask.

Don’t just make great pictures, film it, put it online and at least let us all have a look, make speed drawing videos easy.

The video below, was made with a camera hanging from the ceiling, on a piece of string, it is an example of what you can do, if your prepared to experiment a little but make sure, it is OK to put screws and stuff, into the ceiling, and also make sure, they are safe enough, to hold your camera.

The video below, was made using a boom stand, it is a stand that is used by musicians to hold a microphone, this was adapted, to hold a Kodak, Play Sport, HD camera and was completed, in different places, around the house. I was able to do this easily because the boom stand, is so versatile and easy to set up, I have been able to set it up, between myself and the camera, without much restriction or the work being obscured, by my body.

The video below, was again made with the, Kodak, Play Sport camera and microphone boom stand, between myself and a computer monitor, with only my hands getting in the way, which is unavoidable.

You can see this page called Cartoon Yourself Easy for Fun, on a site called Hubpages by clicking the link.

This page is not very technical because it does not need to be, just like art doesn’t, what is important is doing it, if your efforts are not as good, as you would like them, don’t publish them and try doing it another way. If you do this you will learn, far more valuable information and make your set up, to suit yourself.

To make speed drawing videos, does not take a great deal of money or technical skill, just a mobile phone, with a camera and some way of fixing, your camera into a position, so it can film your work, as you are doing it.

Hand drawing.

The hand is a remarkable tool, worthy of taking the time, to do some close observation by making some, detailed, hand drawing studies. If you are interested in the figure or drawing people, then it is important to study the hand in detail because it is also, an important aspect of human interaction and communication. The hands, have a great deal to say without words but through gestures, they can often convey many different meanings and are an important element, of visual communication, along with body language.

Research shows that none verbal signals, carry about five times as much impact, as the verbal channel. Hands play a significant role, in this none verbal communication, so if you are drawing studies of the figure, it is important, to have some understanding, of what the hands might have to say.

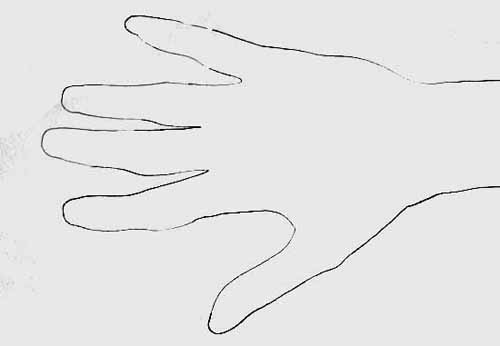
If you want to start understanding the hand, more closely, then you could place your own hand, palm down on a piece of paper and just draw around it, to start out with, now take a look at the shape without any detail.

Basic outline of hand showing no detail.
Basic outline of hand, showing no detail.
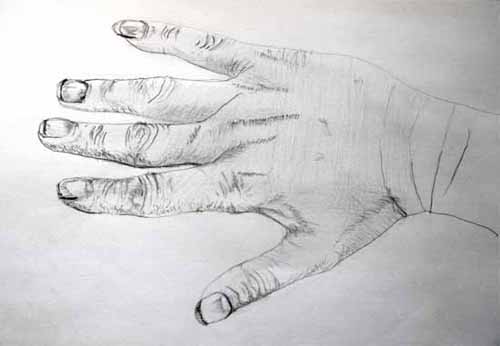
Image of a hand with more detail using hatching methods of mark making mostly.
Same hand but with more detail, using, hatching methods of mark making, mostly to further define, shape and form.

Now you could draw your own hand again, with more detail this time, it will enable you to observe it more closely and understand the shapes, and form better.

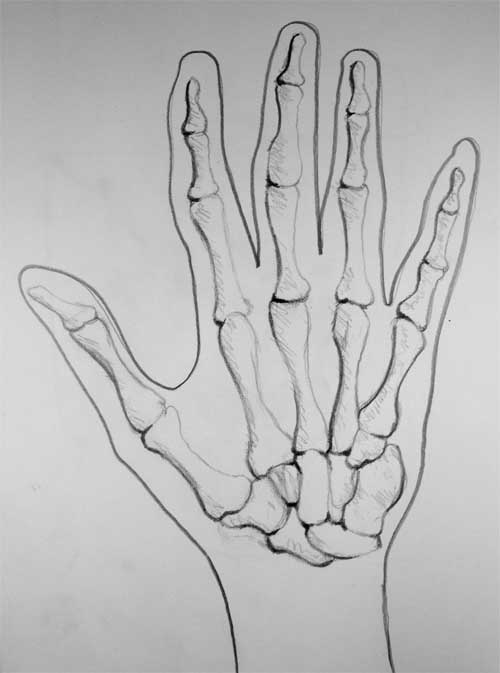
Image of hand showing bone structure in some detail.
The hand showing bone structure, in some detail, Phalanges, Metacarpals and Carpals, that make up the different bones in the hand, and part of the wrist.

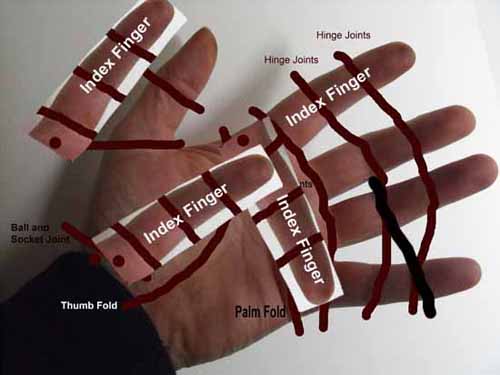
The body of the hand or the main bulk area, is about the same length as the index finger, from the knuckle, ball and socket joint.

Hand diagram image of important features
Hand diagram, image of important features to understand.

Notice that the index finger, is similar in size to other areas of the hand.

Hand image showing how the index finger can be used to understand the proportions better.
Hand image, showing how the index finger, can be used to understand the proportions better.

If you place your hand over your face with the tips of your fingers near the hair line and the part of your palm, where it connects to your wrist, at your chin, you will notice, if you look in the mirror, that your fingers start, just below your eyes. This means that the distance, from your chin to just below your eyes, is the size of the main body area, of your hand from your wrist, to the start of your fingers. Multiply this by two and you have the size of the whole hand, from the wrist to the finger tips.

Because of the fact, that there is as much information, to be noted in the hand, as there is in the rest of the human body, it is worth understanding why and also realizing, that they are often just as difficult to draw.

The hand consists of four fingers, a thumb and the main body area, being the palm.

The human body/figure, consists of two legs, with similar joints as the fingers, two arms and a head, so both have, a similar number of corresponding elements, that make both hand drawing and figure drawing, near equal in difficulty.

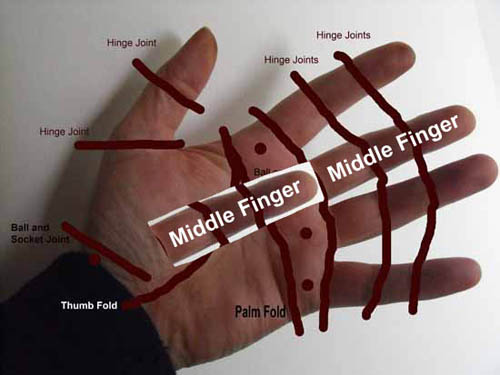
Hand image showing how the middle finger can be used to understand the proportions better.
Hand image, diagram showing, how the middle finger can be used, in comparison to understanding, proportional sizes better.

For further information on hand drawing, please take a look at this video, on YouTube, How to Draw a Hand (With Spoken Explanation), Mark Crilley, manga creator, of ‘Miki Falls’  presents a tutorial, on how to draw a hand, paying close attention, to getting, the general proportions right and giving another well presented, overview of the main characteristics.

What are drawing techniques?

Drawing techniques, are the manor in which procedures and methods are applied, for accomplishing a desired result, everything we do, when making a drawing, is usually created by using, different drawing techniques. The different marks we make, when drawing pictures, is also part of our technique and the different combination’s, of marks we use, so already you can see that technique, is actually not one but different combination’s, of contributing factors.

There are many different techniques, for using, the many different tools, available to us, as artists, with some being conventional and others, being less conventional.

The manor in which we, use the tools available to us, eventually gives our drawings a look and feel that is unique, to us as artists because of the combined but differing techniques, we use to execute these drawing skills.

For example, there are many different ways, to hold a pencil and the way in which you hold, a pencil, has a direct influence upon your technique, when using it. I see many tutorials, that are aimed at teaching people how to draw, that insist on telling the learner, how to hold a pencil when practicing, these different techniques, giving them the idea, that the pencil, has to be held in this way or that.

The problem with doing this is, if everyone, did everything in exactly the same way, then it is very likely, they will all produce drawings, that would not necessarily be exactly the same but very similar and without variety.

The best way to hold a pencil, is the way that feels best to you.

Are drawing techniques important?

It seems, that those who experiment with using these tools, in different or less conventional ways, end up producing work that is fresh and unique, giving it an edge on other, similar work.

This is not to say, that using tools in the conventional way, does not produce good work or that everyone, has to use these tools in less conventional ways, to be different but that the best way, to do anything, is the way you feel most comfortable doing it.

By all means, experiment with every drawing technique, you can possibly think of or learn, so as to at least have, the ability at your finger tips because of the importance, of the next point.

The point is this; if you practice your drawing skills often, then you will also develop your own drawing techniques and styles, that will eventually make, your overall style unique to you.

Picture of a hand of hand showing bone structure in some detail.
Picture of a hand showing bone structure in some detail, Phalanges, Metacarpals and Carpals, that make up the different bones in the hand, and the wrist.

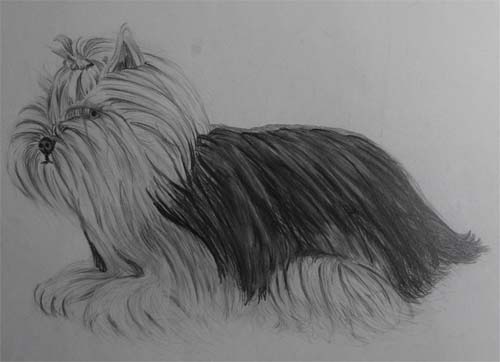
Yorkshire Terrier Hatching Drawing

Outline drawing.

In the process of drawing images, we often start out with a basic outline drawing, as the foundation, for learning where everything else goes, in relation to the outline and each other. The problem I find with many beginners and well practiced people alike, is they do not always, understand outlines very well, also as in the case of beginners, they do not understand at all, in many instances.

The easiest way to draw and understand outlines, is by using tracing methods of drawing because when you trace an image, you can only, realistically make an outline, as tracing doesn’t lend it’s self to shading. Tracing also gives you a better understanding, of how pictures work, especially when trying to understand, construction drawing.

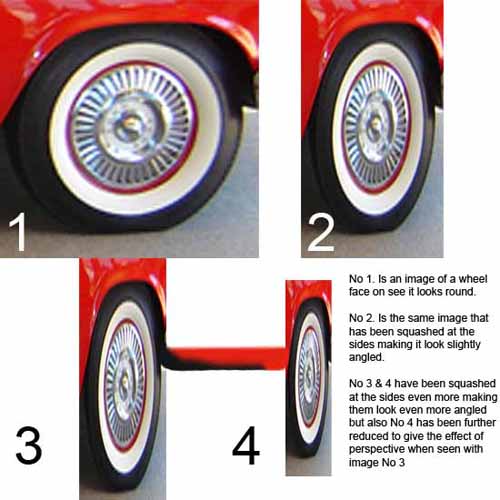
Wheel images showing perspective distortion.
Car wheel images showing distortion when seen in perspective.
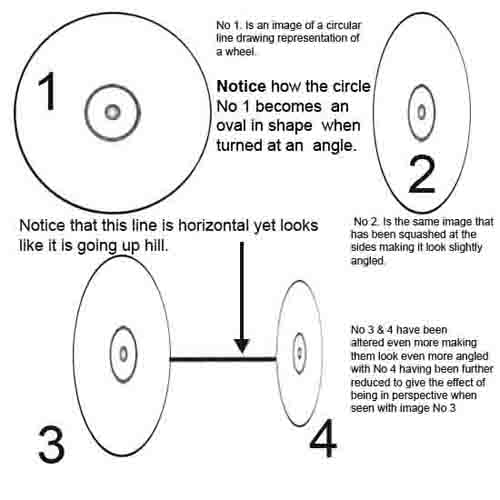
Wheel images showing perspective distortion line drawing.
Car wheel images showing perspective distortion in a line drawing format.

Let me explain, by using a car wheel as an example, we all know that wheels are round but they are only round, when we look at them directly face on, because when we turn them, at an angle, they become, more and more oval, in shape.

The correct term to call this oval shape, is an ellipse and is something many people have problems with, when trying to draw them accurately, to find out more about this, please take look at single point perspective and two point perspective, you will find the both helpful.

Get yourself some pictures that you might like to draw and trace them, so as to be able, to take a look at these images, as only line drawings, you will notice when tracing these outlines, that they are most often, not as you might have thought they are.

Doing this, will help you to understand, that shapes are not often, the shapes we think we see and that wheels, are most often not circular but oval, along with many other shapes we see but actually, only think we see. This is because our brains tell us that wheels are round or that a shape is this shape or that shape, when in actual fact, many shapes are not what we think they are because our brains are telling us what we see, rather than actually, seeing what we see.