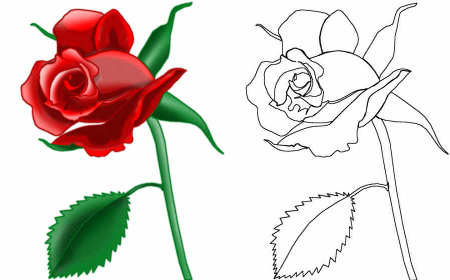
There are a number of ways that you can learn how to draw a rose. The easiest way to do this is to trace them from your computer screen. To do this just go to any search engine and do an image search for a rose. Then find the rose that you like and trace it directly from the screen.
If you place a piece of printing paper onto the computer screen with the rose image on it you will be able to see a faint outline of the rose through the paper. This can be helpful because you will only be able to see the basic shapes that make up the rose image. This will also give you some ideas as towhat basic outlines actually areso will be helpful if you are a beginner as it will give you a better understanding.
You can then trace the outline onto the paper with a pencil or pen. Do not press hard on your pencil or pen when doing this as it might damage your screen. You can go over your tracing again after it has been traced off the screen if you want to by placing it on a flat surface. The more times you draw a rose the better you will get at doing it.
Above you will see an info-graphic image that will show you how to draw a rose step by step. It is especially good for helping children or adults visually. You will need to click the image to open it, then again to enlarge it to it’s full size for seeing better.
You might want to watch it as well on the video below seeing somebody else do it helps as well.
How to draw a rose the best way.
The best way of learning how to draw a rose or anything is to start out by simplifying that which you want to draw. Reduce the object down into lines and shapes to make it more simple. Intentionally try to ignore all the fine details and simply concentrate on the outlines and shapes in order to get to the basic outline first.
When you have created your basic outlines you can start to shade and create the more detailed areas of your rose drawing. I always try to start with the lightest tones first working to the darkest tones last of all because it is easier to remove mistakes when they have been made lightly. If you make them too dark then they will be much more difficult to remove if you need to later.
I always try to leave as much of the paper showing as the lightest tone of all which is usually white. I gradually make the shadows darker and darker as I progress because this helps me focus my observations as the drawing becomes more defined. There are lots of photographs online to help you with your drawing. Learning how to draw a rose can be more difficult if you try to copy real roses so to make it easier it is best to copy from photographs.
Another way to learn how to draw a rose.
Using a reference grid is easy.
Like the example above you can draw a grid over the top of any picture you want to draw. Then copy the grid onto a piece of paper so you can see where the line touch the grid. You use these as points where you can see that the marks go into. Copying the image with help of a grid also helps to teach you to look from side to side, up and down. This is how people draw images that look good by looking in this way to find reference points and making sure they line up with each other.
Drawing means to pull something and is also the action of making a drawing, with a tool, usually a pencil, a pen or other such implement. The first early drawings where probably made with the finger. It is a doing word which means it is about tangible events. Something that can be observed and even measured or used as a measurement in, and of it’s self.
This leads to something else. If drawing is an action then all the thinking in the world will not make any drawing real or tangible because it is about doing not thinking. That does not mean there is no thinking involved because it is quite the opposite.
Drawing is informed in two ways at least.
It is informed by what you think and what you do.
Drawing in this context is a learning mechanism much like the process of learning it’s self. You make a drawing and whilst doing it, as well as after doing it, you think about what it is you are doing, and reflect on what you have done. That information informs what you do next and so your drawing skills develop in an informed way. This happens through action which is the description of learning, action and reflection. It would be difficult to do drawing in any other way because it is an action and you cannot move any part of your body without thinking about it first.
Anybody could read about the drawing process and understand the mechanisms of how drawing works in theory but to get the full extent of the whole process necessitates action on the part of the learner.
Drawing is a valuable resource.
Drawing is used in so many ways by people who create, from engineers to film producers, even teachers use drawing as a means of delivering knowledge to others. The visual space is easily accessible to most people because we only need to look. Looking takes little effort on the part of most people and visual images can be powerful. Human behaviour is influenced by the environment. Visual information is a large part of that human environment so must be influential.
It is among the easiest as well as possibly the most practical way for conveying visual concepts. The fairly convenient supply of simple drawing tools could easily amount to drawing being more commonly used as compared to the majority of alternative tools of expression.
Drawing really is easy, expectation is the issue.
At the basic point of ability everybody is able to trace drawings from images. Everybody can create their own unique images doing this, even those people who believe they can’t draw can do this. Almost everybody can draw. If they can move their arm and make marks following a line around a shape they can draw. Beyond that drawing becomes many other things, all of which are heavily based on expectations.
I must repeat again that human behaviour is influenced by the environment. Visual information is a large part of that human environment so must be influential upon us and our expectations. Our expectations are subjective based on our knowledge and environmental influence giving us differing degrees of expectation. An influence that impacts upon our decision making processes and actions.
My drawing is derived out of a broad Knowledge base of disciplines both analytical and philosophical in origin. This together with the utilization of social spaces, performative actions, community arts, public arts, installation, visual, dramatical, textual and audible interactions. Acting on the world in which we live as a participant and observer.
All because I was lucky enough to believe drawing was an important action to take.
In this example of how to paint portrait drawings I paint a portrait of Davy Jones, who was most famous as the singer with the 1960s pop group, The Monkees. This piece of work took 1 hour 14 minuets to complete from start to finish and was painted with a brush, using black Indian Ink.
A video example of how to paint portrait drawings.
The tools I use to show you how to paint portrait drawings are as follows: black Indian Ink, clean water, a small soft number one brush, tissue paper, an A4 drawing pad and a little plastic bottle top for mixing my wash into.
In this first image below I have drawn a basic outline of the eyes and sides of the head, using ink that has been watered down into a wash. This helps because it makes it more easily corrected later, if I get some of the marks wrong which is almost guaranteed to happen, as I am not perfectly accurate with my outlines. This is the reason and point of making basic outlines when learning how to paint portrait ink painting is because none of us are perfect. Learning to draw is a step by step process where each step leads to and informs the next step.
The information below will walk you through the process step by step.
You will notice a big dark area on the left hand side of the head in the images below. This area is where I will be testing out my tonal values, whilst I am working away at the drawing to make sure they are not too dark. It does not matter if they are too light because I can always darken them again later if I need to.
Water proof inks.
Inks are usually water proof so dry quickly and are very difficult to make lighter again if an area is too dark. You shouldn’t ever use ink that is too dark to do your basic outline when learning how to paint portrait paintings with ink and then you will never have this problem.
I also work wet into wet, which means that I add a little more black ink as I go along, into some areas to make them a little darker, whilst the paper is still wet. This allows the ink to spread out, bleeding into the area more easily and making it better to create graduated tones from dark to light. I also have a piece of clean tissue paper in my other hand, that I use to dab out any excess ink or water from areas as I work away at my painting.
Reference points.
Please take note that in the next image below, around the nose area, I have only made a few small marks so as to use as reference points for drawing the nose in more detail later. This is to enable me to get my drawings accurate and reduce the potential for mistakes in the construction of this drawing. These reference points all make it easier to get my drawings accurate because I have them in place to judge and compare against each other as well as in relation to the subject I am copying from. This enables me to more accurately establish the correct proportions of the facial elements, such as eyes, mouth, nose, hair and overall composition of the face. This will aide me in getting the facial features all in the correct places as I build up my painted drawing of the face and will help you also when learning how to paint portrait drawings.
Rechecking information in the process of learning how to paint portrait drawings.
In the image below you will see that I have completed the mouth and added the other left hand side of the jaw line. This information has now been rechecked to make sure I have the jaw line accurate and you will notice that the jawline on the left hand side is more heavier. This is because of two reasons, one is that the face is more heavily shadowed on that side of the face and also because I did not get it quite right the first time around. It is the reason why my ink has been watered down into a wash and also why I only make small marks in my construction process of doing the painting.
In the image below you will see that I have now started putting in some of the larger areas of shading and the detail around the nose area. You might also notice that on the right hand side of the face along the line from the nose into the cheek there is a darker line at the end which is another mistake. You can also see that I have been able to hide it once again because my ink is watered down to make it lighter in tonal value.
Now in the image below you will see that I have filled the face out with more shading helping to create more shape and form to the face and again you will notice that the mistake on the cheek is becoming less noticeable. How to paint portrait drawings
Now you can see in this image below that I am using the brush stale to measure where the top of the head goes so as to get it more accurate, although you cannot see this in the video because it is speeded up, I do a lot of measuring with my thumb and the brush stale. I think that this is where the term, rule of thumb comes from as it is commonly used by many artists to measure the accuracy of there drawings and paintings. How to paint portrait drawings
Now I have made a dot where the top of the head should be so as to get this accurate. How to paint portrait drawings
In the image below you will see that I have completed the construction drawing and marked out where everything should be in relation to everything else on the face this will now make putting the detail into the drawings more easy and accurate. How to paint portrait drawings
Now with my construction drawings accurate I am starting to fill in the detail using raw black Indian Ink straight from the jar with no water added. This will now bring out the detail and give the painting more depth, defined shape and form, making it seem more like a three dimensional shape instead of a flat two dimensional drawing.How to paint portrait drawings
I have started with the eyes, nose and mouth, being careful to only paint in the darkest areas that are black, you will be amazed at how this brings the drawing to life, making it look realistic.
Notice in the completed drawing below that I have added some suggestion of the shoulders so as to make the head seem like it is not just floating around on the paper.
How to paint portrait drawings with ink is best practiced often if you really want to get better at it and just for good measure here below is another portrait painting of Bob Dylan.
Portrait drawing of Bob Dylan another cool drawing of his Bobness ( The never ending tour) to add to my collection. Like most things I do, there has to be a reason.
Portrait drawing, why Bob Dylan?
Let me tell you a story about a man who started work at 14 years of age, he was employed to work on the building of the Anglican Cathedral in Liverpool, the United Kingdom. This building was officially started in 1904 and ended in1978 after this man retired. This man worked his whole life in the same job, in the same place, for 51 years at least. I can’t remember his name so I can’t find an image to do a portrait drawing of him but I can find Bob Dylan.
His Bobness (Bob Dylan) has been doing this also. He was about 20 years old when he hit the New York music scene in 1961 and now 70, a grand total of 50+ years. If you take into account he was forming bands when he was in school, at a time when young people left at 14 or 15 years of age, then it might be 55 or more years.
His Bobness is still at this time, (2011) performing a stage performance on a regular basis and has been entertaining for the past 50+ years. Is that a good enough reason, to do a portrait drawing of Bob Dylan?
Regardless of any cash they did or didn’t make doing their life’s work, it must be seen as an achievement of the highest order, 50+ years doing the same job and being successful at it, is an outstanding achievement.
Bob Dylan has been on a never ending tour all his life having taken a little time off, now and then with sickness, as happens to us all. He tells us that he is just a song and dance man, nothing more, nothing less. One who just sings songs and is not prepared to wear anybody else’s crown. An entertainer, just like Arthur Lee or Julian Beever, artists all of them, so I did this portrait drawing, titled, The Never Ending Tour. Surely it was a worthy cause and good enough reason to do it?
The Never Ending Tour.
The first thought when doing this portrait drawing or perhaps even before I did the drawing, was I did not want to just copy a picture of Bob. That would just be a copy of someone else’s portrait and would not say very much more about the man or his life.
I spent a while doing some quick portrait drawing of Bob trying to find some ideas and get a feel for the features of his face. This is something I often do when portrait drawing as do lots of other artists. I also looked at hundreds of pictures of the man on line, in magazines and books.
Luckily many of my friends are fans of him so there is an abundance of material around me. These people are also like encyclopedias on the man, so I could find out lots of information about him. This helped me build up and hone in on this knowledge base to inform my thinking.
This also gave me plenty of opportunity to discus these ideas and get some feed back from real human beings. As well as what was going on inside my own head.
If you don’t put anything into the box then you are not going to get anything out of it, I always think.
Bob Dylan like many Americans during the 60s had idolized, Woody Guthrie, an American singer, songwriter and folk musician. Woody it seems was a man with a wonder lust, a traveling man, who jumped trains and lived as best he could, at times singing for a nickel or a dime. Bob Dylan perhaps because of the influence of his idol was much the same and spent some of his time with Woody, after seeking him out in New York during the last years of Woody’s life.
During both Wood’y and Bob’s time trains where a big and important part of a traveling man’s life. For both men there would have been a great deal of time spent around trains and stations. The rail road had to be a strong feature and influence in Dylan’s early life as well as well as woody’s. The never ending tour and the railways went hand in hand so had to be a feature in any Bob Dylan portrait drawing and also having a great significance towards it being a journey.
Success is a journey of many events.
The graphite pencil portrait drawing of Bob Dylan below was my first attempt at drawing him. I used graphite pencils, mostly a 2b and 4b. This was only a quick drawing but I do think I captured something of the man as he is nowadays in this drawing. Much older than the young man moving to New York in 1961.
The more you draw a persons face, the more you learn about it, so it is important to do this when trying to create something original from photographic information. Doing this also helps to find ideas for new concepts and ways of stating something in your drawing, as often they suggest ideas.
All of this together is more than good reason to do some preliminary drawing and also having a wish of creating something original it is necessary for feeding your imagination I think.
I found an image on line of Bob not looking like Bob at all, wearing a woolly hat and a jogging suit out for a jog. It was not your usual image so I had to have a go at drawing it just because of this reason and I was looking for something original. The drawing you will find below is another quick drawing with a black Sharpie marker pen.
Notice how I have put the suggestion of other images into the drawing as well, trying out ideas and trying to generate something new from the other drawing by looking for a way of combining them.
The image below was mostly drawn with maker pens, using different grey scale tones, I did the out line sketch with graphite pencil. I tried combining another image of a railway line into the drawing because I was trying ways of portraying something different to make the drawing original. The railway line idea became a good idea when I thought about it after because it would be a significant part of the never ending tour.
Now I had something to work with I created a photographic type image by combining different images together using a free photo editing software called GIMP Shop, this is the image below.
When I am working on idea I like to put them together in one place so I can see them all together and then keep looking at them looking for further ideas.
From looking at all these ideas together I came up with the idea that I could use the blacked out side of the face to bring something else into the image and after looking at it for a while I thought that I could make an image of somebody sitting down on a stool playing the guitar. This then instigated me doing a quick sketch of what it might look like and can be seen in the drawing below.
I now had the idea I was looking for, a story of the never ending tour, a younger Bob Dylan and older version, with a railway line between both so I then made the portrait drawing you can see below by taking bits from different photographs, combining them into something completely new.
A graphite pencil portrait drawing of Bob Dylan, the never ending tour, size A3, 16″ x 11-6/5″.
Bob Dylan portrait drawing, The never ending tour, 2011.
This image is another idea made from thousands of guitar picks manipulated in GIMP photo editing software. It is a portrait of the New York City Musical Landscape in 1961 in which the young Bob made one of his first stops on the Never Ending Tour.
The video below was another experiment captured with a camera and illustrated with black Indian ink, a brush and some water.
If you want to learn how to draw from memory, you will first need to be very familiar with the subject you are drawing, for example if you draw the letter (A) then it will be a memory drawing the way you have always drawn the letter (A). So every time you draw one it will look very smiler to the last one you drew. This is because you have done this an unknown number of times throughout your life and it is fixed inside your head. It will not change unless you purposely make an intended change. As you are very familiar with the letter (A). The letter (A) is a very simple shape and does not present very much to remember. If lets say you draw a car, then that is very different shape, that is far more complex than the letter, making it far more difficult to remember. It is more like the whole alphabet, upper and lower case plus numbers together.
Now I know that it is highly likely you can draw the alphabet and numbers from memory quite easy. So this also proves that you know how to draw from memory because you can do it with the alphabet. The question is how many times have you done this, the answer to that question is unknown. It must be thousands if not millions of times depending how old you are but how many cars have you drawn?
10,20 or even a 100, it bares no comparison to the amount of times you have drawn all the letters and numbers of the alphabet, and so it is highly unlikely you will be able to remember what the car looks like, without having it in front of you to look at. There is a lot to remember if you want to know how to draw from memory. A point to note (when I am talking about how to draw from memory I do not mean any old car, I mean a specific car like a Mustang or a Corvette). Most people can draw a box shape and put a couple of wheels on it that would make it a representation of a car but in most cases not a very good one, so that is not what I mean.
To be able to know how to draw from memory you need to train yourself to do so by braking it down into component parts. Wheels, windows, lights, tires, side view mirrors, door handles, the list goes on and on, that’s why it is difficult. Each one of these is a shape in it’s own right, so is a lot to remember, but it is possible. By breaking it down, you learn how a car is actually made up or constructed, you learn the anatomy of a car and all cars look very similar overall.
All cars have the items mentioned above and all of these items can be found in very smiler places on all cars. If you know that a car has wheels and these wheels are usually a defined distance apart from each other. This distance can be measured by the number of wheels it takes to get to the next wheel. Then you can easily make a template in your mind for placing these wheels the right distance apart. You can easily check this distance by measuring the number of wheels from your first wheel to your second wheel and you will get it right every time.
If you know that the wind shield usually starts about half the width of a wheel behind the front wheel then you know where it goes on most cars but also remember that every one is slightly different as well. If you learn where everything goes in this way by teaching yourself this from doing it on purpose, then you learn how to construct cars without having one to look at because you know where everything goes. Also if you use an item like a wheel as a measuring tool then everything about your car will be in proportion to everything else just like they are on real cars.
In the image of the car above you can see 3 red double sided arrows these are all the same size which show you how much smaller the rear of the car is because of its distance from the front. It also shows how far the windscreen is from the front wheel which is about half the width of the wheel. You can also take note that the door line actually almost measures up with the windscreen.
If this image was directly side on you would be able to measure the distance between the wheels and everything else about this car by using the wheels as the basic measurement which would give you a greater understanding of the anatomy of this vehicle.
If you do this then just doing it will make you more familiar with the subject of cars but also anything that you might like drawing for example, faces or people because they are not very much different from each other either. If you understand the anatomy of the subjects you draw as well as having a familiarity with them combined, you will be more able and know how to draw from memory. If you do this a lot then you will also be prompted by the parts you are drawing as to what the next part to draw might be. This also helps as you are following a process of actions that becomes a natural pattern of behavior.
A good way to practice memory drawing is to draw cars or other subjects like faces as described above and to then when you have finished the drawing, using these techniques to draw the same drawing all over again, while it is still fresh in your mind, without looking at it. Doing this will reinforce your learning, making it stronger as a memory and build up your ability to remember by exercising your visual memory, making it stronger and more capable.
Below you will find a video of a drawing I did using this method but changing the viewing position, so I was drawing it from a different angle, also making it even more difficult. When wanting to be able to draw well, you really need to push yourself hard to make, what seems like very little ground at the time but that is what will make you progressively just that little bit better.
Let me explain this in another way, cartoon films once consisted of thousands of hand drawn, hand painted images, where every single one had to be the same as the last one but in a different position or pose from a different angle. For one person to do this on there own it would take years so the cartoon makers would hire many people and break everything down into smaller components, bite sized chunks so any body could soon learn to do that one small part. Then they would have a team of say 20 people doing only small parts making it easy and also enabling them to complete them very quickly. If you had spent the last 10 years doing this for a studio that made cartoons do you think that you would probably be able to almost do this with you eyes closed?
The way to learn how to draw from memory is learned by drilling yourself to do so through continuous repetition, drawing the same thing over and over until you learn where everything goes, and purposely drawing your attention to understanding where it goes also. View Gareth Pritchard’s profile on G+
This pencil portrait drawing of Kurt Cobain was drawn in June 2011.
The pencil portrait drawing was an experiment for trying out some ideas, I made some quick sketches with different tools that where all dismal failures and I should have realized that there was something difficult about this image making it troublesome.
I chose Kurt Cobain, front man for Nirvana, the Grunge band, mainly because I have had a relationship with him that was one sided as a fan during his and my life, through the television, newspapers, and radio, all with their own brand of creative news.
One starts and they all jump on the gravy train, creating portraits and I am no different except mine is only apencil portrait drawing.
Here I am doing the same thing as them drawing a pencil portrait drawing of a common old rock star because he is familiar and recognizable.
Pencil portrait drawing of Kurt Cobain before getting to the final detail.
I enjoyed Nirvana probably because nothing good happened for me during the late 80’s early 90’s with guitar based bands and I had drifted off into little fluffy clouds, 808 State, rave music. Kraft Work had become popular again and I had been into them much earlier as well, just like, good night Vienna, Ultravox, guitar music was dead and then came Nirvana, and it was Nirvana. No more Mini Moogs and Oberhimer’s, it was Fender guitars and amplifiers, it was aggression, raw complaints and vague lyrics, “I’m so ugly, that’s OK cos so are you”.
All this and the media portrayal of a troubled soul, leading to his suicide, probably adhered me to Kurt Cobain giving me a good reason for drawing a common old dead rock star, dead but not forgotten.
I chose this image of Kurt Cobain from an Unplugged episode for a number of reasons, one of which was because he was not quite looking at the camera, which I think makes a more interesting portrait of somebody, caught unawares. The image actually looks like he has been caught day dreaming and he is not actually focused or aware of his real surroundings, I think the image portrays this, whether it’s true or not.
The pencil portrait drawing.
Kurt Cobain pencil portrait drawing, after picking out the detail, perhaps the finished V1
I did not realize how difficult this was going to be until I tried to capture it and the eyes caused me problems. I chose these eyes because they where wet, glassy, reflecting stage lighting but only prominently in Kurt’s left eye on your right hand side, those other glints that are there but dimmed out, where difficult to get to the right tone. The light reflecting in the iris of the left eye was also difficult for the same reasons.
I chose these elements because they are strong along with the stubble and the hair, as my intentions where to only suggest Kurt Cobain, I failed to satisfy these intentions in this drawing I think, yet learned so much more that I will use.
All of these aspects are what makes the drawing good but much more difficult with a need for deadly accuracy to capture the qualities of the subject but I made it difficult because I did not want it to be photographic, either. I had intentionally chosen an image with lots of marks in it, so as to be more able to use hatch marks as well as tonal modelling. This meant there was a lot more work involved in reproducing those marks which was a very time consuming task. I thought that I could just make hap hazard hatch marks to suggest some of the facial areas and I was wrong because it didn’t work out that way making me feel that I needed to do them almost exactly as they were.
I have drawn many portraits in the past and know that photographers usually over expose faces in an attempt at making the subject look better by masking the details with light. This usually produces images that are flatter than in real life showing less shape and form also showing less detail making them less work for someone doing a pencil portrait drawing.
The initial drawing took me about 30 minutes and you can see it being drawn in the video below.
I first toned the paper with graphite dust making it a light grey color or tone. This was done because of the hair being blond and very light but also I did not want to create a drawing that looked like a photograph, I wanted it to look like a drawing with many marks just being suggested rather than definite. Past experience told me that I could do this successfully by using an eraser to draw with as well as a pencil, thus leaving the paper white by removing the graphite with an electric eraser.
I do have a process for doing my drawing which is probably similar to most other peoples but just in case it is not I think it needs to be stated. On most occasions I will draw some quick sketches of what it is I am going to draw, even if I have a photograph, as it helps me to focus my attention by getting things wrong, which in most instances I often do. This process also teaches me about the anatomy of the face and I learn how the elements are connected to each other, giving me practice runs at getting it right, all building up my visual memory of the face which I think helps me see it in greater detail. The whole process is about focusing down on the detail by starting out with a simple drawing, a quick out line sketch then refining it by adding more detail.
After this quick initial drawing I then set to work on finalizing the detail and correcting any discrepancies between the drawing and the photographic subject, by this I mean that I make sure everything was where it was supposed to be. I do this by working through each component of the face; for example, I would take the subjects left eye on the right hand side of the paper and draw every detail as I could see it in the photograph. I always try to work from right to left because I am left handed but anyone who is right handed would be best working from the left, this enables you to more easily see what you have already drawn. It also helps because your drawing hand is not rubbing on the drawing you have been doing thus changing it by smudging the marks you have already made.
I then draw this left eye on the right hand side of the paper as I can see it, trying put every piece of the detail into place as I move around this smaller area, comparing each component in it with each other till I am satisfied that it looks good and close to the original.
Then I move to the other eye to do the same thing but then also comparing it with the eye I have just drawn to make sure it also is in the right place at the right angle being the right size and shape. At this point I begin to see discrepancies in the eye I have already drawn and although I was satisfied with it at the start I soon find faults with it when comparing with each other and the photographic subject.
When I am satisfied that the eyes are right I will move to the nose and mouth working them together along with comparisons being made with the eyes as well, at this point I start to make comparisons with the outlines of the face also. This whole process is slow, laborious and I find it enlightening because it seems to me that as you build you’re drawing, the parts you draw, the marks you make, reveal other marks that are missing in other areas that you have just finished. Areas or marks that you where sure where correct when you made them seem to change after doing some more work in another area and looking again you find they are not as good as you thought they were, so the process of elimination grows more complex and more detailed.
I do not do this process in one go but over a few days by going back to it and doing a little often with the biggest part of the work being visual study and comparison. The largest part of the work has no physical presence as most of it is just looking but it is essential to the end result.
The tools I used in the initial drawing where a HB 0.5 mechanical pencil some graphite dust scraped from a 3B graphite stick, a charcoal pencil and a Jakar battery operated eraser on A3 300gsm water color paper using the smooth side of the paper. The graphite dust was blended in using soft tissue paper by lightly rubbing it in circular motions so as not to leave streaks as I did not want them in this drawing but sometimes I do use them for further interest.
In the seconded stage I decided to use some black chalk pastel instead of the charcoal pencil because it adhered to the paper and other pencil marks better and was better at minimizing the reflected light that comes from the darkest areas of graphite pencil. Rubbing in some pastel over the top of these graphite pencil marks dulls them making them blacker and much less reflective I only used this in the darkest areas because if it is over done you end up with a very different tonal quality. If over done you end up with a pastel drawing and not a pencil drawing but used sparingly it can be very effective, notice the neck and under the chin area, around the ear, as well as the pupils, and top lip. In the second stage of the drawing where I was doing the detail I changed pencil I was using for a Derwent 4B sketching pencil which is a very soft black and layers very well over the top of previously drawn pencil. I also used the battery operated eraser and a paper stump for blending the pastel into the graphite pencil and also blending the graphite pencil it into the white of the paper.
I also experimented with a Derwent 8B dark wash pencil which is a pencil that you can wash out with some water on a brush I tried this over some of the not so dark areas in an attempt to kill the reflected light that comes from graphite pencil marks. This did work to some extent, not as well as the black pastel chalk did but I could not use the black as these areas are not meant to be black and making them black would change the whole tonal quality of the drawing completely.
HB 0.5 mechanical pencil, 3B graphite dust, a charcoal pencil, Jakar battery eraser, A3 300gsm water color paper, chalk pastel,Derwent 4B sketching pencil,paper stump, Derwent 8B dark wash pencil.
I succeeded in capturing the essence of Kurt Cobain and also managed to only suggest many strong features like the hair, creating a graphite pencil portrait drawing with photo realistic elements and also bold suggestive pencil marks. I am happy with the outcome as it now presents a better understanding of the 3 dimensional shape of the face giving me the possibility of further exploration and experimentation.
But…
My next victim will be, His Bobness.
Bob Dylan deserves to be immortalized in a graphite pencil portrait drawing if only for the fact that he has been on a never ending tour for possibly the last 50 years of his life, intentional or not that is a feat of endurance and lasting commitment.
You are not going to believe this but all pictures are easy pictures to draw, ha, ha. 🙂 🙂
The truth is drawing is easy when somebody tells you how easy, there are many easy pictures to draw but most people don’t realize, don’t know, don’t want to know or don’t want you to know and that’s the truth. The visual culture, visual media, commercial arts, arts industry, all make pictures the easy way and the only people who don’t are us, ordinary people like you and me. Except I realized this by accident really because I spent 40 years learning the hard way first, the most difficult way possible really by teaching my self.
Easy pictures to draw, lonely cliff castle drawn by human not machine.
Easy pictures to draw is how the industry do it.
Take a good look at the drawing, commercial arts industry, colleges, universities and you will find far less little actual drawing going on than you realise, much of it is now done on computer, by machine, yet we all try to do it the hard way by trying to draw free hand. Yes there is great self satisfaction and accomplishment in doing drawings free hand but when you are trying to draw like your favourite artist or draw your favourite picture, you will find that it usually comes from the art media industry, who don’t do it that way really when they use machines to do it and it’s quite different.
They use computers for everything nowadays, so it is questionable if it is actually drawing at all, aren’t they very easy pictures to draw when a machine does it for you?
Yes it takes some understanding and skill to use those machines but the question is are they doing the drawing or are they operating a machine that’s doing the drawing?
Of course nobody tells you this, nobody tells you when you are drawing or learning to draw that you are competing against machines and I am not sure if they or any body at all even realizes it but drawing with a machines is questionable because who’s actually doing the drawing?
Those that use these machines don’t tell you either but like I have already said I am not sure they have realized, I would love to tell you that it’s some dirty secret but I am not sure it is, they just let you form your own opinion which is what we mostly all do anyway.
The dragons flight showing easy pictures to draw without using a machine to do it.
Let me get back to the subject after my little rant, easy pictures to draw are very easy so easy even you can do them and compete against these machines, not only compete but use them so you are doing the drawing, real drawings that you can tear in half if you want to and throw away. Try doing that with a computer drawing, have you tried ripping a computer in half, don’t bother it’s a waste of time and somebody else might have the drawing on their computer so you won’t even be able to destroy it. Just a silly joke don’t take me too serious on it please!!!
How much does a pencil cost, $2 perhaps for an expensive one, how much does a computer cost $500 for a reasonably cheap one, how much does the software cost, any thing from $50 to a $1000 plus depending on what it is. You already have access to a computer or you wouldn’t be reading this so no worries there, all you need now is a pencil and some paper.
I am sorry but I still haven’t told you how to draw easy pictures but I will if you join me and down load my free report (How To Draw Easy And Simple), please find a subscription box at the top of the page, soon it will be you finding easy pictures to draw.
Easy pictures to draw, Dragon Land, drawing in pen and ink, showing that we are not machines, we are human beings.
If you want some drawing ideas then take a look at the page at the end of this link to drawing ideas.
Easy pictures to draw will soon be everywhere you look if you read my report, I promise and I will also not be filling your email in box with spam every five minuets trying to sell you something either, once or maybe twice a month if your lucky will be sufficient but not trying to sell you stuff.
Hello there, I am not going to give you any easy drawings to draw as such because I do not really know what you like or would want to draw. The best part of this is you chose your own drawings and I am going to make it very easy for you. I am going to make it so easy anybody can do it, if they can hold a pencil. I am going to do this by telling you a way how you can draw anything you want, quite simply by drawing it off your computer screen, it’s that easy.
Easy drawings to draw are so easy they are simple.
Yes, easy drawings to draw are so easy, you just find the pictures that you like, that you can get from anywhere on line or from photographs that you or other people have taken, they could be anything. You can get your favourite Anime or Manga pictures they could be pictures of animals or people the choice is yours and all you really need to do is trace them from your computer screen, it’s that easy.
The method.
If you place a piece of plane printing paper on your computer screen over a picture that you like you will be able to see it through the paper because of the light coming from your computer monitor. This means that you can trace any picture you want if you can get it up on your computer monitor screen and it’s so easy. Most commercial arts, drawing studios have tools that are called light boxes or rather they used to have these because now nearly everything is done on a computer, meaning the light boxes are not used so much anymore. These light boxes are a box with a light inside and a piece of glass or clear plastic over the top, where you place the picture you want to draw and a clean piece of thin paper over the top to draw onto. These light boxes are not as good as a computer monitor because the light has to shine through the image and the paper you want to draw onto, whereas with a picture on a computer monitor the picture is its self the actual the light source.
Any picture you like.
Tracing pictures in this way will help you to be able to draw any picture you like quite easily and once you have got the outline of the picture you want to draw then you can finish it off by doing the shading or colouring it in, but don’t attempt to do this on the monitor remove it first. Many people might think that this is cheating but it is just an easy way to learn how to draw easy drawings and if you do this it will help your free hand drawing improve a great deal.
Easy drawings to draw very time.
Now that you know this you should also know that you can now draw any picture you want easy and get it right every time, the simple way, why make things difficult when they don’t have to be?
Just one thing you need to know first before you do this, if you are using a flat soft screen TFT monitor then do not press hard on your pencil as it will damage the screen, if it is glass then it will be fine and will not get damaged. There is no need to press hard on your pencil because you only need a light line to start out with as you can easily go over your drawing when it is on the table, desk or where ever you do your drawing.
We will not accept any responsibility if you damage your monitor as there is no need to press hard on your pencil and by not doing so it will also help you to become better at drawing.
This is a quick drawing taken from a paused video on YouTube.
This is another character, Bleach taken from the same place as the one above in the same way.
Easy drawings to draw are so easy, even you can do it when you know how and now you have been told how.
Composition definition, it’s about putting the elements that make up a picture together.
Composition can also be interpreted as an organizing of art elements according to the principles of art.
According to Wikipedia (The principles of art) are movement, unity, harmony, variety, balance, emphasis, contrast, proportion, and pattern.
Composition principles can also be described as balance, emphasis, pattern, contrast, proportion and gradation.
Composition elements can be described as line, size, color, texture, value, shape and space.
In the image below that was created as scribble heads the composition does not work very well and does not follow the (The principles of art) mentioned above very well at all. You can see the foundation work for this image if you follow the easy cartoons to draw link to see scribble heads.
Let me tell you why the image below does not work by giving you an image that does work and then let you think about what has changed in the drawing to improve on the composition.
Besides the 3 overlapping circles of composition being added to the image what else has changed?
The first image is unbalanced it is does not have an emphasis or good pattern, although contrast, proportion and gradation are good enough. The line, size, texture and value are fine but there is something wrong with the shape and space, so think about what has changed with the shape and space?
Why does the reversal work better, take notice of the direction of the eyes?
What you need to consider is how the lines in a drawing lead your eyes around the drawing so when you place an arrow in a picture it will grab the attention of the person looking at it and they will follow it to the tip. Lines work in a similar way and can be used as capture points but also the direction in which something is pointed can do the same thing, so a face looking to the side will direct your eyes in that direction. Depending on where the eyes are pointed will depend on where your eyes are directed and one of the worst moves you can make is having the eyes looking out of the picture. Now look at the first picture of the scribble heads again and notice that the eyes are looking all over the place with no uniformity, structure or sequence, giving no meaning to the composition.
In the last image below it is a different story because the eyes and positioning of the heads says things by the direction of the eyes within the drawing, which head is looking at what or who?
The finished and final composition below works best with the arrow being placed as an attention grabbing device to draw your attention to composition.
Before you begin to draw caricature cartoons, it is best to understand the principles of a caricature drawing, this is a drawing of a person whose features, have been exaggerated and it is usually drawn in the same style, as cartoons are drawn. When people draw cartoon characters, they usually draw them as line drawings in a cartoon style, so this is a good place to start. You might even want to try just copying a few cartoons, to give yourself a feeling for drawing in this style and doing this will give you some great results, quite quickly it will enable you, to get a feeling for it.
Simple cartoon line drawings taken from media to develop a caricature.
Caricature drawings are not just for those who are beginners, many professional cartoonists, make a good living out of drawing caricatures and often use this, as a way of supplementing their income and promoting their skills, in a fun way, you can often see up and coming cartoonists drawing impressive sketches in tourist areas of the passersby and celebrities in a few minutes for a couple of dollars. The caricaturists can often be seen working away their magic at fates and carnivals all over the world, amusing people, but this practice is most common in Europe. It is a fact that we do not all want to be able to draw a caricature in just a few minutes for the most part it is about enjoying the doing a finished product and how long it took does not matter to most of us.
Famous personalities are often exposed to caricatures and cartoons in newspapers or magazine articles. Artists often include props on the drawing to help readers make a connection with the celebrity in question and their caricaturized drawing. Footballers can be depicted kicking a football or a film star can be in a famous scene from a film. Singers can be seen holding microphones or playing instruments, the artist can also choose a minimum for the detailed environment in which the subject maybe sitting in a vehicle or standing on a patch of grass to place them somewhere. It is these little added details that are so important to take into consideration when learning to draw caricatures.
The elements of exaggeration in caricature drawing make them a perfect medium for satirizing what’s going on in current affairs. Images expressed in this way are sometimes created by taking on different aspects of the person’s behavior or personality, as well as the way they look or their appearance. An example of a politician that is regularly seen speaking out of turn can be depicted with a large mouth. An illustrator might even decide to highlight this feature by drawing a politician with their own foot positioned in their mouth, such an example is where the artist as actually thrown in a familiar take on the caricature drawing which describes the person accurately, they have got a big mouth and they are always putting their foot in it.
To discover caricature drawing well the first step to take is to focus yourself on becoming observant at finding peculiarities in other people. You have to teach yourself to be able to pick out their most outstanding, unusual or interesting features so you can exaggerate them in your drawing. Begin with facial features of the person; for example, look for particularly large or unusual shaped eyes, round puffed out red cheeks, peculiar noses that might be long, flat, wide, small or big, a pointed chin, narrow or large toothy grin. Many cartoonists often only draw just the face and shoulders a portrait type drawing but others will extend their drawings to the full body and use other bodily features such as height or lack of it, small, round and fat with these being exaggerated to make them funny looking. This is often seen as more difficult to draw but can help the novice to produce more useful material, making his subjects more recognizable. Taking the whole figure into consideration is probably a larger part of creating the distinguishing characteristics of the person being depicted. So when looking at how you might draw a caricature, you should also consider what other props you want to use to get the most out of your image.
Using news items to create caricatures Cheryl Cole is up for attention.
It is most often good practice to start by taking your subjects from strangers in still photographs. There are an infinite number of images that are appropriate subjects that can be found online or in newspapers, beginning with strangers who will not get hurt if you mock them then as you get better with identifying and drawing the main features of individuals you can move on to draw more familiar subjects.
Politicians are good subjects if you had an interest in politics then you could make political statements based on the news in fact the news is a great source of subject material for caricature drawings.
News story lines can give you plenty of subject material to practice how to draw caricature cartoons as satirical sketches.