Category Archives: how to draw graffiti style.

3d drawings, anamorphic secrets revealed.

3d drawing secrets.

The secrets of anamorphic 3d drawing and the amazing 3d drawings of street artists are no longer a secret any more. Follow the information contained on this page to reveal how it can be understood using a reference grid.

The video below shows a clipper lighter standing upright, nothing unusual or outstanding about that. The problem for many people, is to understand how it can be drawn to look like it is standing upright on flat 2d piece of paper. The secret of 3d drawings used by street artists that you need to know, is how to create the anamorphic illusion. If you know how to do this then it is not a problem. This is for those who do not know and would like a better understanding of this illusion.

Please see the video below to see this in action.

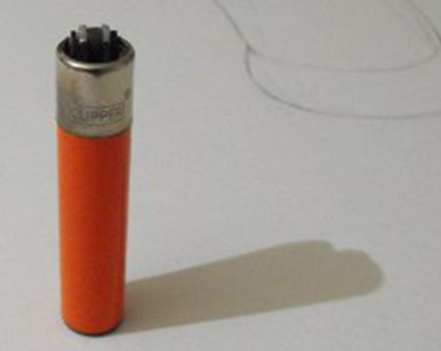
An example of a Clipper Lighter standing upright to be used for our 3d drawings.
A Clipper lighter standing upright to be used as an example.

3d drawings using a camera.

Most street artists when creating these anamorphic 3d drawings use a camera to aid the process and describe their technique as drawing by eye. This means they are drawing by looking and using the camera as a guide for doing so.
GIMPed pumpkin head.
Don’t be a pumpkin head get GIMPed.

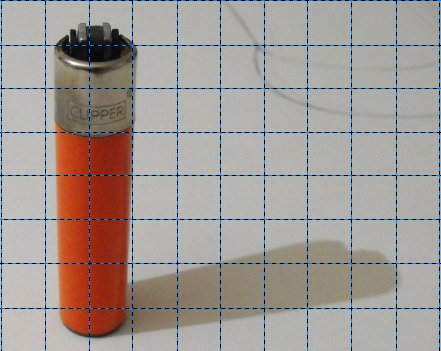
In the image below a grid for reference has been drawn over the top of the lighter image and it has been cropped using the free GIMP photo editing software. Many artists use reference grids for getting their construction drawing accurately draw. This can be easily done using a pencil and straight edged ruler. If you don’t have access to photo editing software you can do it by using a print out of the image.

Clipper lighter with grid for taking 3d drawings from.
Clipper lighter with reference grid placed over the top for aiding our 3d drawings.

Using a camera viewing window to do 3d drawings.

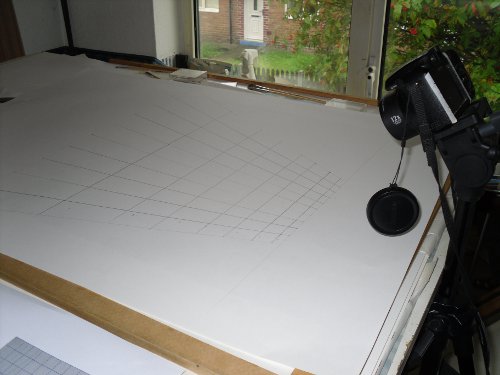
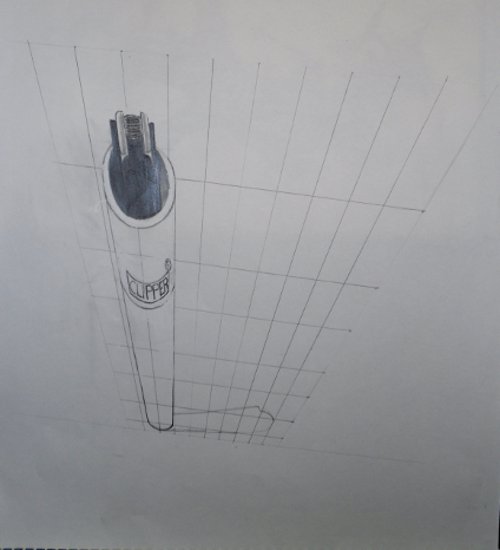
The grid was drawn onto a piece of A1 cartridge paper to replicate the grid in the image above but as can be seen in the actual drawing, the grid drawing is far different from what can be seen through the camera lens. Notice that the grid drawing gets wider and wider, the further away it is from the camera. This is because of distance, indicting that the further away the object is, the bigger it needs to be in order to compensate for that distance.

The secret to these 3d drawings is realizing that this is what makes the technique work, being able to compensate for distance.

View of the camera in position and 3d drawing grid.
View revealing the position in relation to the camera of the drawing area and 3d drawing grid

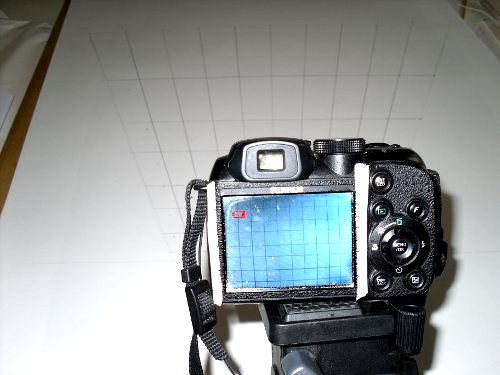
Below is an image of the camera showing both the drawing of the grid and the image, as seen through the camera lens, showing the difference between both. In the camera viewing window the grid looks like it is made up of squares. Where as the actual drawing isn’t made up of squares at all. This enables us to see how the camera lens at this viewing plane is distorting the drawing. Thus making it seem like it is made up of squares, when it is not. It is actually the same as any other perspective grid used to draw 3d drawings, that would be drawn to depict an object as if being looked at from the top. With the bottom tapering off into the distance as will be shown the the next image below this.

View of the reference grid drawing and what it looks like through the camera lens.
This image shows a view of the reference grid drawing and what it looks like when looking through the camera lens

Notice the two strips of masking tape placed down each side of the camera viewing window on the camera. These have been marked out with with lines equal in measurement. Using these measurements down the side of the viewing window of the camera, helped me to draw the grid. Using them as guides to see where to put the marks on the papers drawing surface. This was only necessary for the horizontal lines of the grid. The vertical lines can be measured after you have drawn the horizontal lines. This can be done by dividing the top and bottom lines by ten as in this example but this will depend on how many squares you want in your 3d drawing grid. The more squares you have in your grid to make 3d drawings. The easier it will be to complete your end drawing.

The secret of 3d drawings using a camera technique like the preferred choice of street artists.

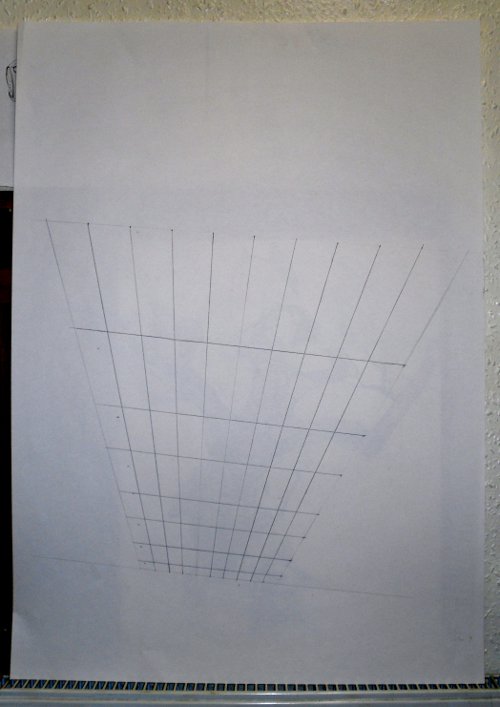
In the image below you can see what the reference grid actually looks like when viewed from the front as you would normally. Please take notice of how the grid is wider at the top than the bottom. Also notice how the squares have become elongated and the horizontal lines are further apart as they get closer to the top of the paper. This image below shows what a perspective 3d drawing grid might look like if it was being used to draw an object, such as a building being viewed from above.

Anamorphic perspective grid for doing 3d drawings.
Anamorphic perspective grid for doing 3d drawings viewed directly from the front.

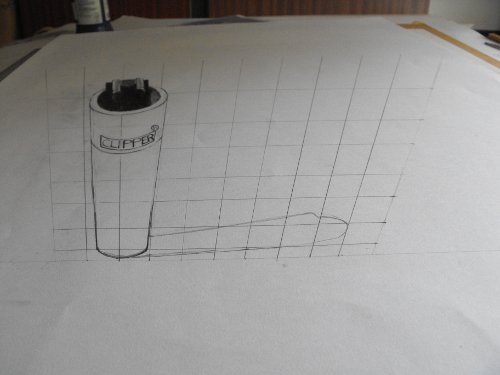
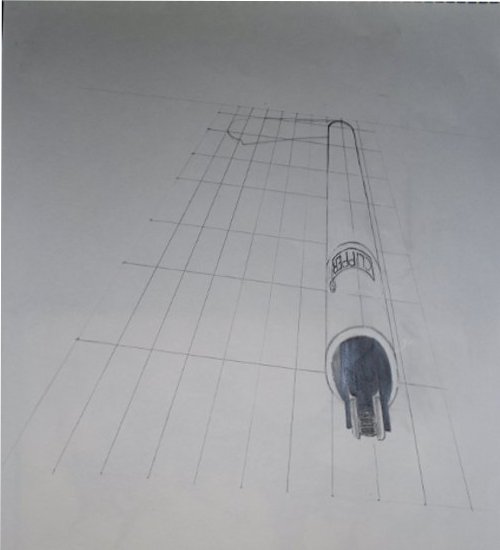
In the next image below I have drawn the Clipper lighter using the perspective grid for 3d drawings as a guide to accurately draw the lighter at this distorted perspective. Also notice how it can be seen in the camera viewing window. Notice how when looking at it through the camera viewing window it can be seen as a Clipper lighter standing up right and how the drawing grid also seems to be made up of squares.

3D Drawing Through Camera Lens Showing Lighter And Grid Showing Visual Plane.
3d drawing of the lighter through the camera lens, this is showing the lighter and reference grid at the correct viewing plane for comparison .

The image below is a photograph of the 3d drawing, showing further how it looks just like any other drawing of a lighter standing upright. This gives you a visual demonstration of the optical illusion created by the anamorphic 3d drawings perspective and the focal plane of the camera.

3d drawing of the anamorphic perspective grid and Lighter
Anamorphic perspective drawing at the correct photographic angle and position as photographed with the camera.

The next image has been photographed slightly out of position and not at the correct focal plane. This enables you to be more able to see what it looks like in reality. It is revealing the distorted 3d drawing showing how it is much bigger at its furthest point from the viewing position.

Anamorphic Perspective Grid Drawing Not Sited with Camara Corectly.
Anamorphic Perspective drawing lying on drawing table showing its two dimensional attributes because the camera is not correctly sited.

Below you will find two more images to show what this drawing really looks like, when viewed as you would normally, the first one is the right way round and the second is being viewed, the wrong way round. Taking a look at these gives a better understanding of what the secret really looks like and helped me to visualize the distortion created by this unusual illusionary effect in the technique of making 3d drawings.

This image below is being shown the correct way up and is viewed from the front as you would any other drawing or image, directly from the front. It clearly shows how the drawing is distorted with the top being much wider than the bottom.

3d anamorphic perspective drawing with camera not correctly sited.
The 3d drawing of the lighter as viewed directly from the front showing it as it would be viewed when not looking at the correct angle.

The image below has been turned up side down and reveals that looking at it this way around presents an image that resembles a perspective grid for depicting something that is tapering off into the distance. This is because that is what it is and would be doing. If something is close it will be big and as it gets further away it will get smaller, and smaller, the further into the distance it gets.

3d Anamorphic Perspective lighter Drawing Upside Down From the front.
The same 3d Anamorphic drawing from the front but turned upside down it gives the impression of any normal perspective drawing, creating the illusion of distance.

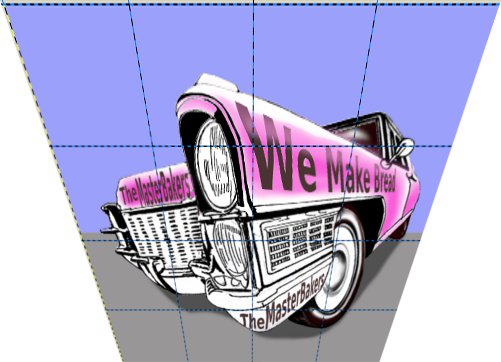
These 3d drawings can be created on a computer using GIMP photo editing software or any other photo editing software if you can distort images with a perspective tool. I found that if I took an image and placed a reference grid over the top of it on a separate layer in GIMP. Then merged both layers together and distorted it with the bottom being half as wide as the top, it created a good example of a drawing grid and picture combined. It produced an image that could be viewed with a camera to make it look like a normal image as shown in the example below.

Cadillac 3d drawing viewed through the camera lens.
Cadillac distorted 3d drawing, viewed through the camera lens at the correct visual plane.

It can easily be traced from an A4 sheet of printing paper.

3d Cadillac Drawing Distorted Image.
This image could be used for tracing as the outline for drawing a 3d anamorphic perspective

This image below is the actual photograph of the distorted image taken with the camera it is the result of this photo manipulation technique to create 3d drawing on the computer for close up viewing with a camera.

Cadillac Image taken with a camera of the distorted image above
Cadillac Image taken with a camera of the distorted image above, to show as an example

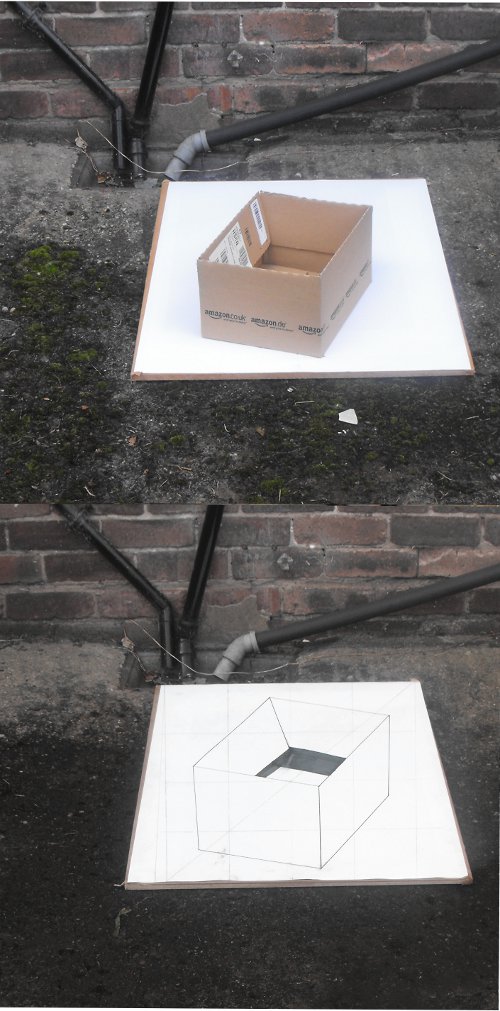
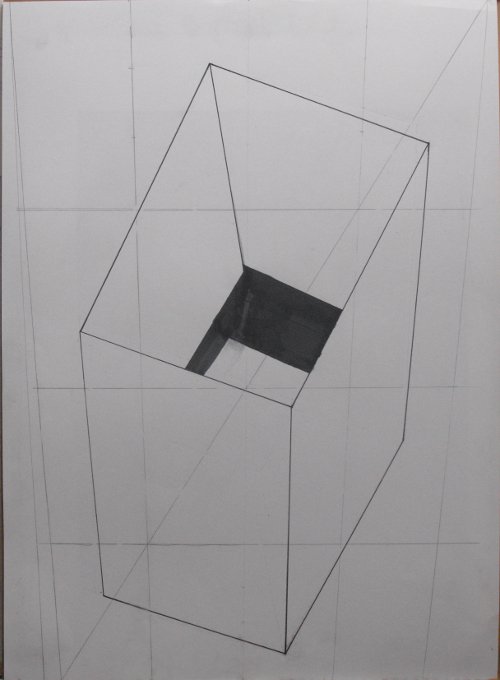
Then there are some images below this, with shots taken at a distance of about 10 feet, 3meters, of a box placed on a sheet of A1 cartridge paper. This is more closer to the working distance experienced by street artists doing, 3d drawings on the street.

3d drawing and box comparison.
3d drawing of box in comparison to the original photograph of the box in the correct position.
Image of 3d drawing of box.
The actual 3d drawing of the box when viewed from the front and showing the reference grid lines.

http://en.wikipedia.org/wiki/Anamorphosis

View Gareth Pritchard’s profile on G+


How to draw Wildstyle graffiti.

What on earth is Wildstyle graffiti?

In the video above the wildstyle writer only gives basic instructions and examples of doing this kind of writing with good reason. Knowing how to draw wildstyle graffiti is something that is best developed with practice and not influenced too much by others.

How to draw Wildstyle graffiti, is a question most difficult to answer, perhaps the name gives us some indication, as to it’s demeanor, the character of Wildstyle is that of being a secret message, of the street but more so a message of the artist.

Each reputable artist has their own nuances, distinct from each other.

Take your name/handle or what ever you care to call it but take it, as far as it can go and just that little bit more because you can. I am old school so arrows play a major role, in all graffiti styles because they point and without trying to be smart, that is the point. Graffiti is an extreme form of forced advertising, a counter force rebellion against conformity and control, from the media giants, the masters of a brainwash plan, conform or be executed for resistance. Graffiti goes back to the beginning of time and has always been measured as a form of protest but it doesn’t have to be because it can just be fun.

Our social masters do not want us, to be free and scream anarchy, if we try to push the envelope beyond the norm, conform, you must conform, saying it’s rubbish because we can’t read it, as if it was ever meant to be read. Words and letters are deformed, beyond recognition into the secret language, known as Wildstyle, stretched and misconstrued, into the words of an anti social song, I am me, have it.

The media moguls conspire in secret but the Wildstyle writer secretly stands alone, like a warrior on the edge of time, forcing his message on an unsuspecting world, I am me, have it.

Long live the king, the king is dead.


Wildstyle graffiti with plenty of traditional arrows for good mesure.
An example of Wildsyle Graffiti with plenty of traditional arrows for good mesure.

Above is a quick example of how to draw Wildstyle graffiti, with heavy play on arrows and black outline, I am sure you could do better, so please do, if you want to write Wildstyle.

Study other writers, in the same way old school fine artists study the masters such, as Leonardo Da Vinci, Michael Angelo, Rembrandt to name only a few, this preparatory work, informs your further development. Copy the Wildstyles of other writers, in order to understand them, this will enable you to mix and match, when drafting your own secret codes of resistance and form your own style.

Always start out with basic, everyday readable letters, then keep working them into oblivion, distorting them into the unrecognizable entangled mass’s, known as Wildstyle, then do it all over again because you can. It pays to revel in your obsession, I do digress for reason because that is how to draw Wildstyle graffiti, by getting way off the subject but keeping, the tiniest thread of whence it came.

The guy in the video below shows three different letter styles that are also known as graffiti styles. He is drawing them big on a wall area with spray cans and gives a great demonstration of his interpretation of how to draw wildstyle grffiti as a basic wildstyle, as well as others. 


View Gareth Pritchard’s profile on G+
 

Make your own graffiti art easy.

Make your own graffiti art because it’s not as difficult, as you might think, it only takes, a basic knowledge and some practice. There are numerous styles of graffiti, but the most common factors are as follows.

  • They are painted in strong vibrant colors, that often clash.
  • They are intended to be attention grabbing.
  • They are often emotive concepts, that question the norm.
  • They often contain 3D lettering.
  • They often contain lettering that overlaps.

The heavy bold 3D lettering is very apparent, in the majority of graffiti art images and is usually the starting point, for most potential artists, as it most often starts with your name, tag or handle. Many of the same, distinctive, bold style lettering’s, used in advertising to create impact, are also used by the graffiti artist, so are a good place to look, for ideas. It most often reflects and resembles, the branding or advertising art world, in many ways but chiefly as a counter alternative, usually with a strong, social, political massage, that the artist is passionate about.

  • The pictures or pieces of work themselves, will contain sharp hard hitting  contrasts.
  • They will be painted in stark vivid colors.
  • They will be well defined, with strong shadows and outlines.

The best way to start, your piece of graffiti art, is by drawing smaller ideas and outlines, that you can later scale, up to any size, this will help you to understand, the problems you might face, when attempting to create something bigger. Scaling your ideas, is a simple task, once you have a smaller drawing or painting to work from. There is an endless supply of ideas online, if you need them, for fonts to use in your graffiti, as well as examples of graffiti, created by others to feast your eyes upon and incorporate into your own work.

The tools to use for your designs or ideas are, pencils, felt tipped or marker pens and fine line drawing pens, all of these come in a very wide range of distinctive and vivid colors, that make them an ideal choice, for graffiti artists.  If you need ideas for a graffiti font to use, there are plenty of sites online, that have examples for you to copy.

Outlines can be created with a graphite pencil and or any permanent black ink pen but fine line and wide chisel or bullet tipped markers, are a preferred choice of many. Shading around the letters you’ve outlined, with a range of different colors will enhance the 3D effects of your lettering, to make it more distinctive.

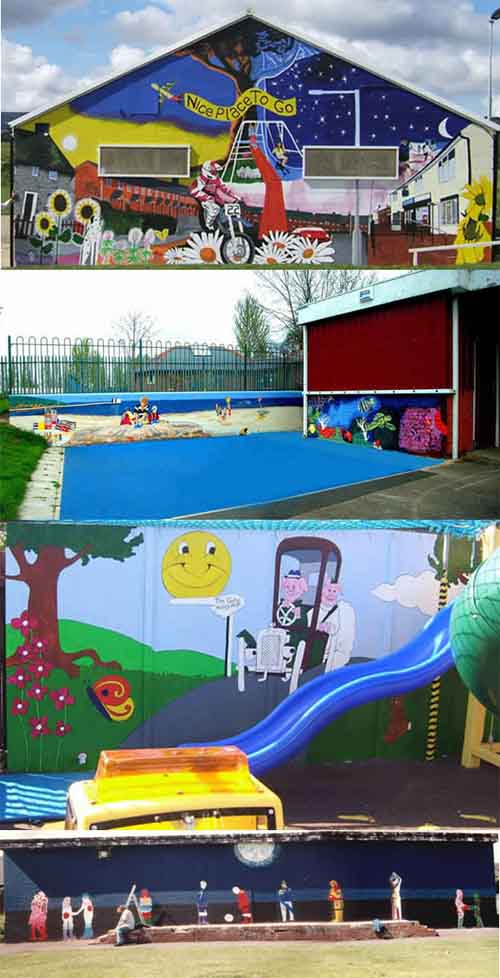
Make your own graffiti art because it is really easy, if you use these methods and it is not as difficult, as you might think.Make your own graffiti art, Images of Brynteg, Caia Park Nursery, Gate Hangs High, Chester, Blacon YPP murals on buildings and an installation piece at Caia Park Nursery.

Make your own graffiti art, Images of Brynteg,  Caia Park Nursery,  Gate Hangs High,  Chester,  Blacon YPP murals on buildings and an installation piece at Caia Park Nursery.

Yes I know, that there are many who would not consider this graffiti but I say “make money not trouble”.

When you are ready, to paint your outline drawings and ideas onto canvases or bigger surfaces, you can use the grid reference method, by marking out a grid over the top of the drawing, you want to enlarge. You then recreate this grid onto the area, where you want to redraw, your original drawing and then use it to measure, where everything goes by comparing grids. Very large areas can be marked out with string, by impregnating it with chalk or charcoal, simply by rubbing it into the fibers, when the string is in this condition, you stretch it out tightly, across the area that you want to mark out. Then you pull it out from the middle and let it go, so it then snaps back against the surface of the new drawing area, leaving a mark imprinted on to it.

You can then use the chalk or charcoal to redraw, the outlines onto your new drawing area. Spray paint the main outlines, with a similar color to the background but a couple of shades lighter or darker, so it will cover more easily if you need to change anything later, allow this to dry before continuing.

Then you can begin to fill in the details and your areas of color, with spray paint in much the same way, by starting with the lightest colors first and the largest areas, then putting in the details. Finally you can carefully fill out the black outlines, with your spray paints, adding highlights and finishing touches at the same time, you can even use a brush, to do your very fine details. Once again let me say make your own graffiti art because it’s not, as difficult as you might think, it is really easy, if you use these methods.

View Gareth Pritchard’s profile on G+
 

How to draw graffiti easy.

How to draw graffiti, the first step you need to take, is deciding, what you are going to write, are you going to write, your name or are you going to give yourself a handle, like many graffiti artists and writers do, all over the world, all of the time. If you want to get a better understanding of, what a handle is, then you can, by following this link to graffiti creator,graffiti art.

Now take a sheet of paper and write your name or handle on it, with a pencil, the way you would normally, write it and have a look, at how you write it. Write it again, only this time make it all capitals letters, with plenty of space between them, now try writing it, in as many different ways, as you can think of and don’t worry, about the end results, it is only the start of a process.

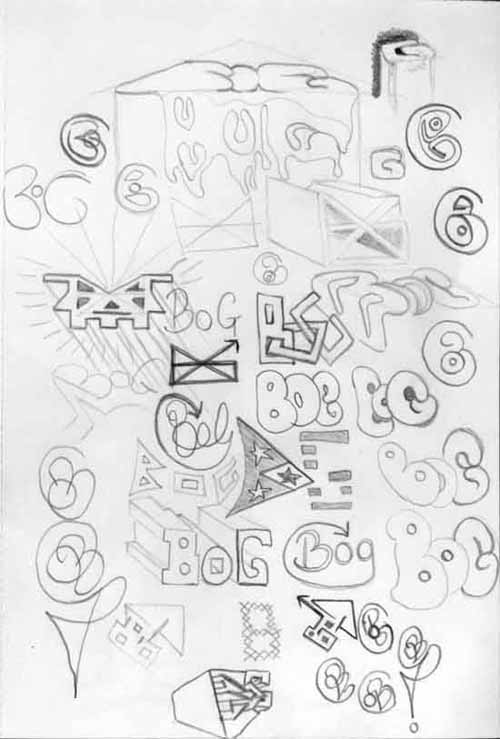
Please see my example ideas, design sheet, below.

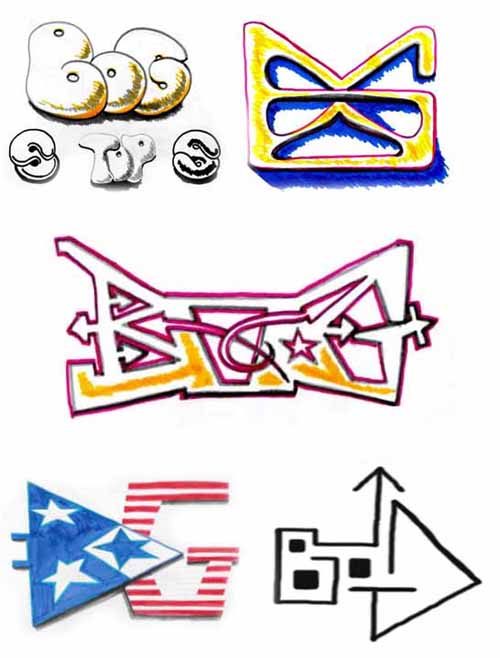
3D graffiti design sheet of ideas drawn with a 3B graphite pencil.
3D graffiti design sheet of ideas drawn with a 3B graphite pencil, cool anybody can do this.

As you can see, I have used different types of letters, curved ones, square linear type letters, boxed, three dimensional letters and some, that are hardly readable as letters at all, the more you create, the better. If you find yourself stuck, after only drawing a few, then look for some ideas, in the news paper, a comic, magazine or anywhere, you might find ideas for lettering.

When you are happy, that you have generated enough ideas, then you can look over them and pick out one or two, that you like, for further development, it can be as many as you like, not just one or two, if you like them. Now, redraw these out on their own, in the center, of a clean piece of paper, try to fill the paper, as much as you can and make these drawings, more accurate, correcting or altering, anything that needs it, as you go. Try to keep your lines faint and not too heavy because they will be harder to cover later.

You can also look online, for lettering and graffiti art because there is an abundance of it, even videos that show some fantastic work, with it all being, a great source of ideas and inspiration.

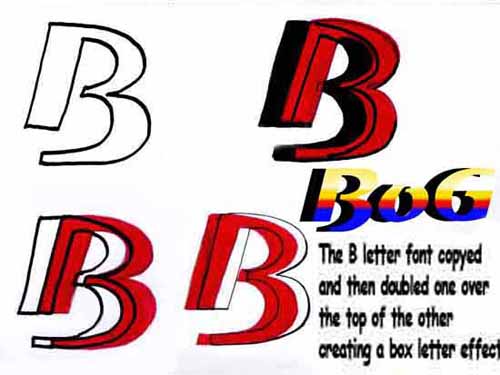
You can create block lettering easy, by just redrawing your letters, over the top of each other, again but out of line, like in the example below.

You could trace your name or handle and then move it a little, to the left or right, up or down and retrace it, over the top, then fill in the area, where you can still see, the first letter outline in black, to create the illusion of shadow.

You can also overlap letters, so the second is hiding, slightly behind the first and the third behind the second, to create the illusion, of one being in front of the other, this overlapping, is a very common feature, in graffiti art.

Please see the example below, to understand this a little bit more, in a visual context.

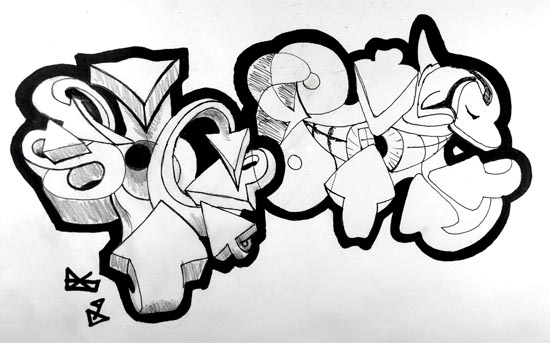
An example of 3d box lettering using outlines over the top of one and other.

Notice the black shadowing, created by moving the letters, up and the black outline, around all the letter shapes, you can also see that the colors have been added, any old how but are still effective because of the, well defined black outlines.

Now you can take some of your original ideas and try some of this, with them, below you will find some of my designs, taken from the first sheet of simple pencil drawings.

3D lettering example of how to use letters doubled over the top of each other to make box letters.

I have added color and black outlines, which is something you should now be trying, with your own designs, you could try many different combinations of color or black outlines, you could even try, colored outlines.

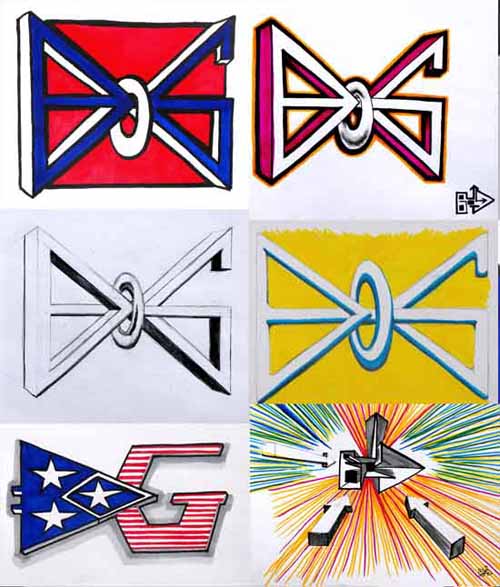
Now you can, further develop one idea and try it, as many different ways, as you can think of or combinations or color, see the examples below, for further development of ideas.

Images of earlier examples that have been further developed.
Some of the earlier examples that have been further developed.
Images of further development graffiti letter ideas.
Examples of further development with graffiti letter ideas.

The tools I use:

Paper or drawing pad, A4 printer paper is good and not very expensive but pads are better, you can carry them around with you, if they are not too big.

Soft graphite pencils, preferably mechanical, pop a point type pencils, 0.5, 3B, if you can get them.

Fine line permanent ink pens, 0.5 and Biro’s, in different colors.

Permanent marker pens, the more colors, the better.

Water soluble felt tip pens, the more colors, the better.

Colored pencils in various colors.

Quarter inch, flat brush and water.

Learning how to draw graffiti, is not difficult or hard and you can get, very good, very quickly, if you put a little effort in to it, honest.

Graffiti creator, graffiti art.

Graffiti, H is for handle.

The graffiti starting point, is the creation of a handle, what is a handle you might ask, it is a name, alias, nickname, code name, tag, moniker and soubriquet, yes it is all of these but it is not, your real name, so the first task for you to do, is get a handle.

Graffiti writers, have always used false names or handles, as they are called but not their real or own name, for obvious reasons because graffiti is illegal, when done on other people’s property, it is considered to be vandalism. I don’t put graffiti on other people’s property but I do have a handle. You don’t have to use a handle, you can use your name, if you want but in order to get into the whole concept, of being a writer, then why not give yourself a handle? A handle works really well, in all areas of art, writers often write under pen names, which are alias’s, so why can’t you, also have one?

Get your handle right.

To do this, you could take, the first letter of your first name and add other letters to it, for example, Peter could be, poP, toP, stoP, floP or you could use your initials, perhaps your initials make a word, like LOB, Lindsay Ogden Bradshaw, aim for something attention grabbing, like boG if your name starts with the letter G, something off the wall, so to speak.

This is where you can be what ever you want, like a piG, just a little side note on this: it was discovered, that in the burial chamber of an Egyptian emperor, there was a statement about him, being a fat pig. This is now regarded as graffiti and a form of political expression, of it’s time, which of course, much graffiti is because would you allow yourself, to be called a fat pig, let alone, an Egyptian emperor doing so.

Graffiti on other peoples property is illegal, it is a crime, punishable with imprisonment in some cases, in other cases it has been punishable with death, many young and older people have died, in pursuit of this lust for self actualization. I will not tell you that you must not to do it because I do not think people, take notice but I will say this much, there is far more to be gained elsewhere, without risking your freedom or your life.

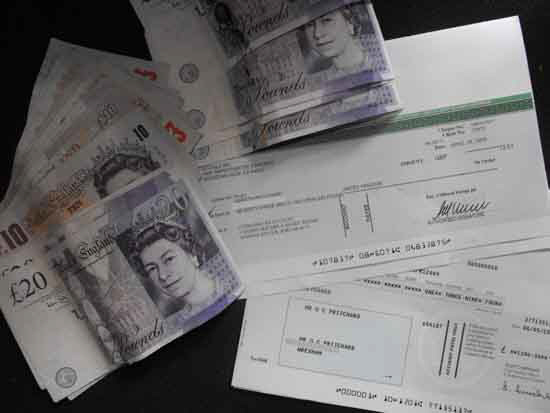
Do not take my word for it, take a look below.

Image of some of the money I have made through graffiti type art.
Make money not trouble, pimp you art not you freedom.

Yes you can make money from doing this, especially if you get good at it; the design processes for graffiti, are not much different, from any other design process, that could be graphic design or illustration.

The handle, is your own personal graffiti art logo, starting point, people get paid, lots of money for creating these, examples of this are the Nike tick or the Mc Donald’s M, your aim, is to personalize your own unique handle, so as to do this, you need to get one. My advice when creating a handle, is to keep it short, about three to four letters, like, zit, xon, Lxxx or xxx, the possibilities are endless.

So get yourself a handle, as the starting point for your graffiti art, as an example I decided to use is the name BoG but I wouldn’t use Banksy, it’s too big. Big usually means time and the bigger it is, the longer it takes to create, time is money.

Graffiti style art, makes money for many artists, not just me, it has also been the starting point and tool, that has enabled many artists, to progress, so it is not worthless vandalism, unless you make it that way, by doing it on other peoples property.

Now I have got my handle, I will show you examples of ways, you can learn how to improve your own skills and develop, your own designs, enabling you to become a graffiti creator.