Tag Archives: Pencil Drawing

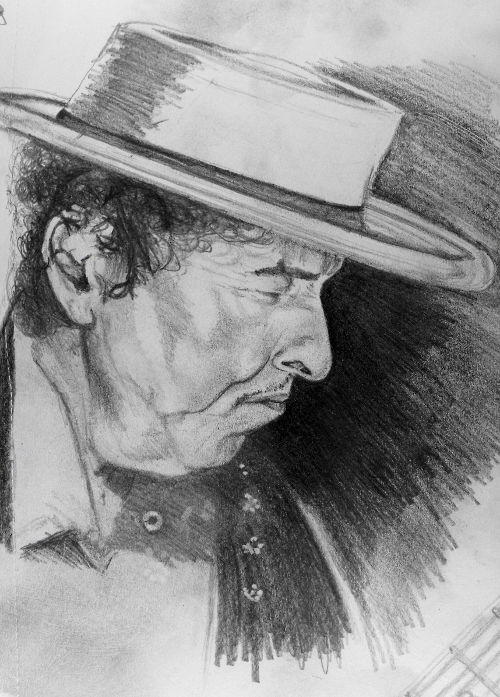
Portrait drawing of Bob Dylan, The Never Ending Tour

Portrait drawing of Bob Dylan another cool drawing of his Bobness ( The never ending tour) to add to my collection. Like most things I do, there has to be a reason.

Portrait drawing, why Bob Dylan?

Let me tell you a story about a man who started work at 14 years of age, he was employed to work on the building of the Anglican Cathedral in Liverpool, the United Kingdom. This building was officially started in 1904 and ended in1978 after this man retired. This man worked his whole life in the same job, in the same place, for 51 years at least. I can’t remember his name so I can’t find an image to do a portrait drawing of him but I can find Bob Dylan.

Portait drawing Bob Dylan Drawings and the never ending tour.

His Bobness (Bob Dylan) has been doing this also. He was about 20 years old when he hit the New York music scene in 1961 and now 70, a grand total of 50+ years. If you take into account he was forming bands when he was in school, at a time when young people left at 14 or 15 years of age, then it might be 55 or more years.

His Bobness is still at this time, (2011) performing a stage performance on a regular basis and has been entertaining for the past 50+ years. Is that a good enough reason, to do a portrait drawing of Bob Dylan?

Regardless of any cash they did or didn’t make doing their life’s work, it must be seen as an achievement of the highest order, 50+ years doing the same job and being successful at it, is an outstanding achievement.

Bob Dylan has been on a never ending tour all his life having taken a little time off, now and then with sickness, as happens to us all. He tells us that he is just a song and dance man, nothing more, nothing less. One who just sings songs and is not prepared to wear anybody else’s crown. An entertainer, just like Arthur Lee or Julian Beever, artists all of them, so I did this portrait drawing, titled, The Never Ending Tour. Surely it was a worthy cause and good enough reason to do it?

The Never Ending Tour.

The first thought when doing this portrait drawing or perhaps even before I did the drawing, was I did not want to just copy a picture of Bob. That would just be a copy of someone else’s portrait and would not say very much more about the man or his life.

I spent a while doing some quick portrait drawing of Bob trying to find some ideas and get a feel for the features of his face. This is something I often do when portrait drawing as do lots of other artists. I also looked at hundreds of pictures of the man on line, in magazines and books.

Luckily many of my friends are fans of him so there is an abundance of material around me. These people are also like encyclopedias on the man, so I could find out lots of information about him. This helped me build up and hone in on this knowledge base to inform my thinking.

This also gave me plenty of opportunity to discus these ideas and get some feed back from real human beings. As well as what was going on inside my own head.

If you don’t put anything into the box then you are not going to get anything out of it, I always think.

Bob Dylan like many Americans during the 60s had idolized, Woody Guthrie, an American singer, songwriter and folk musician. Woody it seems was a man with a wonder lust, a traveling man, who jumped trains and lived as best he could, at times singing for a nickel or a dime. Bob Dylan perhaps because of the influence of his idol was much the same and spent some of his time with Woody, after seeking him out in New York during the last years of Woody’s life.

During both Wood’y and Bob’s time trains where a big and important part of a traveling man’s life. For both men there would have been a great deal of time spent around trains and stations. The rail road had to be a strong feature and influence in Dylan’s early life as well as well as woody’s. The never ending tour and the railways went hand in hand so had to be a feature in any Bob Dylan portrait drawing and also having a great significance towards it being a journey.

Success is a journey of many events.

The graphite pencil portrait drawing of Bob Dylan below was my first attempt at drawing him. I used graphite pencils, mostly a 2b and 4b. This was only a quick drawing but I do think I captured something of the man as he is nowadays in this drawing. Much older than the young man moving to New York in 1961.

Bob Dylan Drawing Graphite Pencil Portrait.

The more you draw a persons face, the more you learn about it, so it is important to do this when trying to create something original from photographic information. Doing this also helps to find ideas for new concepts and ways of stating something in your drawing, as often they suggest ideas.

All of this together is more than good reason to do some preliminary drawing and also having a wish of creating something original it is necessary for feeding your imagination I think.

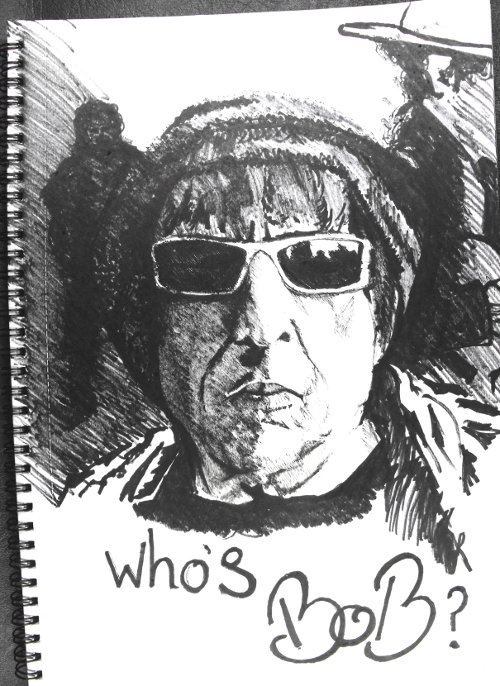
I found an image on line of Bob not looking like Bob at all, wearing a woolly hat and a jogging suit out for a jog. It was not your usual image so I had to have a go at drawing it just because of this reason and I was looking for something original. The drawing you will find below is another quick drawing with a black Sharpie marker pen.

Bob Dylan drawing with marker pens.

Notice how I have put the suggestion of other images into the drawing as well, trying out ideas and trying to generate something new from the other drawing by looking for a way of combining them.

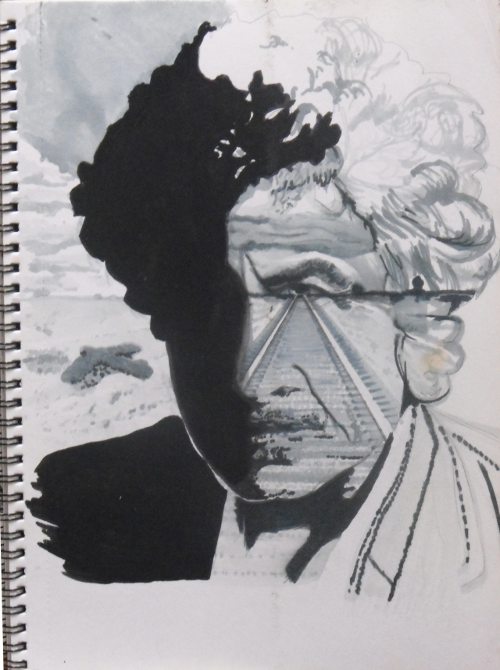
The image below was mostly drawn with maker pens, using different grey scale tones, I did the out line sketch with graphite pencil. I tried combining another image of a railway line into the drawing because I was trying ways of portraying something different to make the drawing original. The railway line idea became a good idea when I thought about it after because it would be a significant part of the never ending tour.

Portrait drawing of Bob Dylan with marker pens, the never ending tour idea.

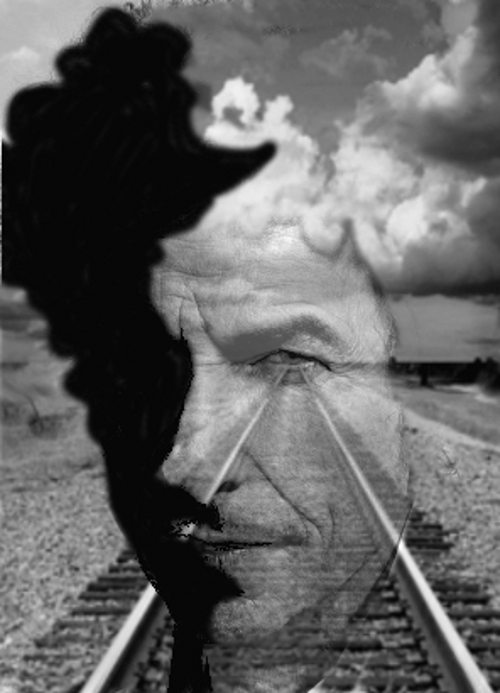
Now I had something to work with I created a photographic type image by combining different images together using a free photo editing software called GIMP Shop, this is the image below.

Bob Dylan Never Ending Tour Photographic Image

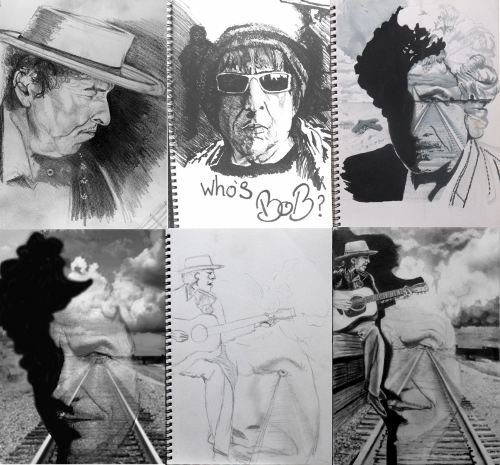
When I am working on idea I like to put them together in one place so I can see them all together and then keep looking at them looking for further ideas.

From looking at all these ideas together I came up with the idea that I could use the blacked out side of the face to bring something else into the image and after looking at it for a while I thought that I could make an image of somebody sitting down on a stool playing the guitar. This then instigated me doing a quick sketch of what it might look like and can be seen in the drawing below.
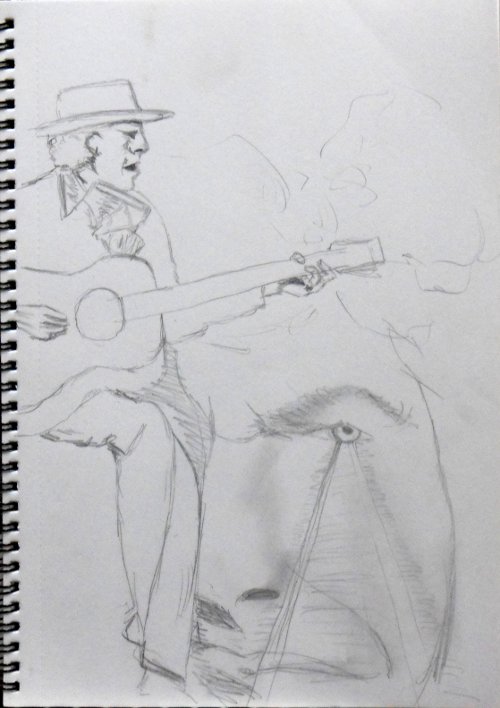
Quick sketch for Bob Dylan pencil portrait drawing.I now had the idea I was looking for, a story of the never ending tour, a younger Bob Dylan and older version, with a railway line between both so I then made the portrait drawing you can see below by taking bits from different photographs, combining them into something completely new.
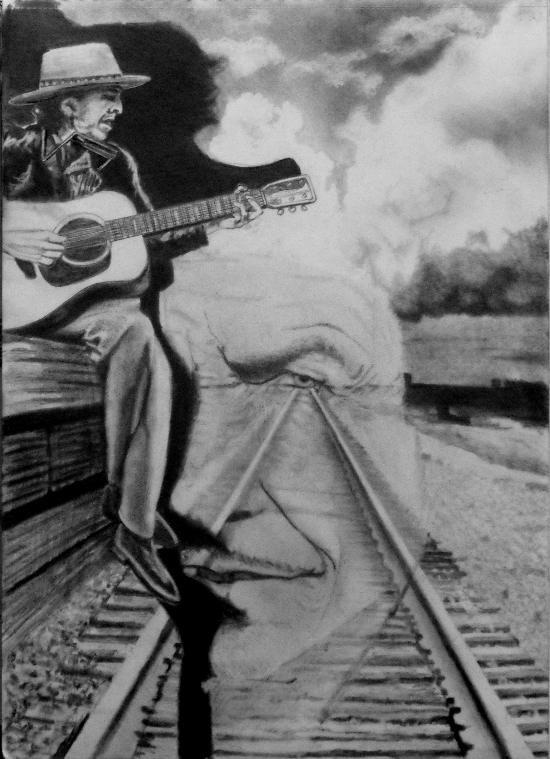
Bob Dylan, never ending tour graphote drawing of the portrait idea.
A graphite pencil portrait drawing of Bob Dylan, the never ending tour, size A3, 16″ x 11-6/5″.

Bob Dylan portrait drawing, The never ending tour, 2011.
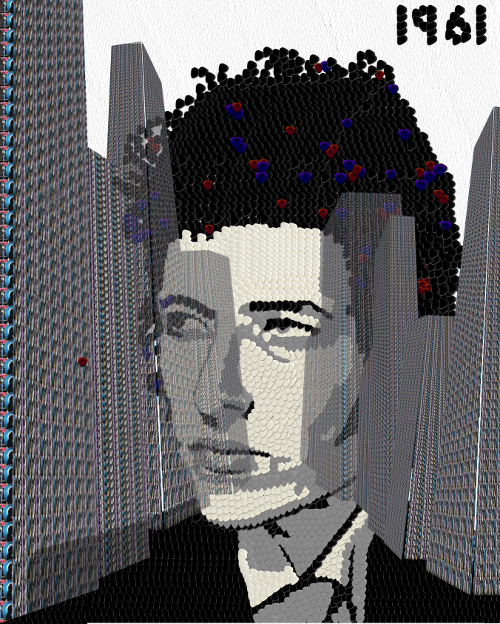
New York City Musical Landscape in 1961.
This image is another idea made from thousands of guitar picks manipulated in GIMP photo editing software. It is a portrait of the New York City Musical Landscape in 1961 in which the young Bob made one of his first stops on the Never Ending Tour.

The video below was another experiment captured with a camera and illustrated with black Indian ink, a brush and some water.

View Gareth Pritchard’s profile on G+

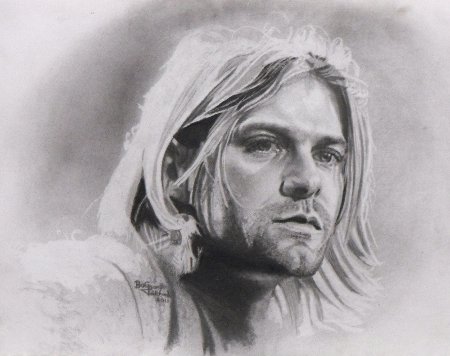
Pencil portrait drawing of Kurt Cobain.

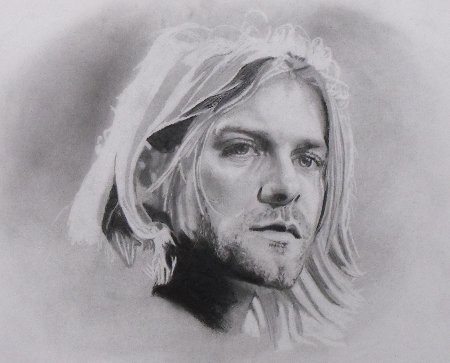
This pencil portrait drawing of Kurt Cobain was drawn in June 2011.

The pencil portrait drawing was an experiment for trying out some ideas, I made some quick sketches with different tools that where all dismal failures and I should have realized that there was something difficult about this image making it troublesome.

I chose Kurt Cobain, front man for Nirvana, the Grunge band, mainly  because I have had a relationship with him that was one sided as a fan during his and my life, through the television, newspapers, and radio, all with their own brand of creative news.

One starts and they all jump on the gravy train, creating portraits and I am no different except mine is only a pencil portrait drawing.

Here I am doing the same thing as them drawing a pencil portrait drawing of a common old rock star because he is familiar and recognizable.

Pencil Portrait Drawing Kurt Cobain
Pencil portrait drawing of Kurt Cobain before getting to the final detail.

I enjoyed Nirvana probably because nothing good happened for me during the late 80’s early 90’s with guitar based bands and I had drifted off into little fluffy clouds, 808 State, rave music. Kraft Work had become popular again and I had been into them much earlier as well, just like, good night Vienna, Ultravox, guitar music was dead and then came Nirvana, and it was Nirvana. No more Mini Moogs and Oberhimer’s, it was Fender guitars and amplifiers, it was aggression, raw complaints and vague lyrics, “I’m so ugly, that’s OK cos so are you”.

All this and the media portrayal of a troubled soul, leading to his suicide, probably adhered me to Kurt Cobain giving me a good reason for drawing a common old dead rock star, dead but not forgotten.

I chose this image of Kurt Cobain from an Unplugged episode for a number of reasons, one of which was because he was not quite looking at the camera, which I think makes a more interesting portrait of somebody, caught unawares.  The image actually looks like he has been caught day dreaming and he is not actually focused or aware of his real surroundings, I think the image portrays this, whether it’s true or not.

The pencil portrait drawing.


Kurt Cobain pencil portrait drawing perhaps finished V1
Kurt Cobain pencil portrait drawing, after picking out the detail, perhaps the finished V1

I did not realize how difficult this was going to be until I tried to capture it and the eyes caused me problems. I chose these eyes because they where wet, glassy, reflecting stage lighting but only prominently in Kurt’s left eye on your right hand side, those other glints that are there but dimmed out, where difficult to get to the right tone.  The light reflecting in the iris of the left eye was also difficult for the same reasons.

I chose these elements because they are strong along with the stubble and the hair, as my intentions where to only suggest Kurt Cobain, I failed to satisfy these intentions in this drawing I think, yet learned so much more that I will use.

All of these aspects are what makes the drawing good but much more difficult with a need for deadly accuracy to capture the qualities of the subject but I made it difficult because I did not want it to be photographic, either. I had intentionally chosen an image with lots of marks in it, so as to be more able to use hatch marks as well as tonal modelling. This meant there was a lot more work involved in reproducing those marks which was a very time consuming task. I thought that I could just make hap hazard hatch marks to suggest some of the facial areas and I was wrong because it didn’t work out that way making me feel that I needed to do them almost exactly as they were.

I have drawn many portraits in the past and know that photographers usually over expose faces in an attempt at making the subject look better by masking the details with light. This usually produces images that are flatter than in real life showing less shape and form also showing less detail making them less work for someone doing a pencil portrait drawing.

The initial drawing took me about 30 minutes and you can see it being drawn in the video below.

I first toned the paper with graphite dust making it a light grey color or tone. This was done because of the hair being blond and very light but also I did not want to create a drawing that looked like a photograph, I wanted it to look like a drawing with many marks just being suggested rather than definite. Past experience told me that I could do this successfully by using an eraser to draw with as well as a pencil, thus leaving the paper white by removing the graphite with an electric eraser.

I do have a process for doing my drawing which is probably similar to most other peoples but just in case it is not I think it needs to be stated. On most occasions I will draw some quick sketches of what it is I am going to draw, even if I have a photograph, as it helps me to focus my attention by getting things wrong, which in most instances I often do. This process also teaches me about the anatomy of the face and I learn how the elements are connected to each other, giving me practice runs at getting it right, all building up my visual memory of the face which I think helps me see it in greater detail. The whole process is about focusing down on the detail by starting out with a simple drawing, a quick out line sketch then refining it by adding more detail.

After this quick initial drawing I then set to work on finalizing the detail and correcting any discrepancies between the drawing and the photographic subject, by this I mean that I make sure everything was where it was supposed to be. I do this by working through each component of the face; for example, I would take the subjects left eye on the right hand side of the paper and draw every detail as I could see it in the photograph. I always try to work from right to left because I am left handed but anyone who is right handed would be best working from the left, this enables you to more easily see what you have already drawn. It also helps because your drawing hand is not rubbing on the drawing you have been doing thus changing it by smudging the marks you have already made.

I then draw this left eye on the right hand side of the paper as I can see it, trying put every piece of the detail into place as I move around this smaller area, comparing each component in it with each other till I am satisfied that it looks good and close to the original.

Then I move to the other eye to do the same thing but then also comparing it with the eye I have just drawn to make sure it also is in the right place at the right angle being the right size and shape. At this point I begin to see discrepancies in the eye I have already drawn and although I was satisfied with it at the start I soon find faults with it when comparing with each other and the photographic subject.

When I am satisfied that the eyes are right I will move to the nose and mouth working them together along with comparisons being made with the eyes as well, at this point I start to make comparisons with the outlines of the face also. This whole process is slow, laborious and I find it enlightening because it seems to me that as you build you’re drawing, the parts you draw, the marks you make, reveal other marks that are missing in other areas that you have just finished. Areas or marks that you where sure where correct when you made them seem to change after doing some more work in another area and looking again you find they are not as good as you thought they were, so the process of elimination grows more complex and more detailed.

I do not do this process in one go but over a few days by going back to it and doing a little often with the biggest part of the work being visual study and comparison. The largest part of the work has no physical presence as most of it is just looking but it is essential to the end result.

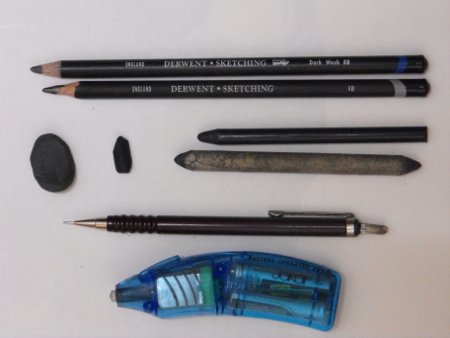
The tools I used in the initial drawing where a HB 0.5 mechanical pencil some graphite dust scraped from a 3B graphite stick, a charcoal pencil and a Jakar battery operated eraser on A3 300gsm water color paper using the smooth side of the paper. The graphite dust was blended in using soft tissue paper by lightly rubbing it in circular motions so as not to leave streaks as I did not want them in this drawing but sometimes I do use them for further interest.

In the seconded stage I decided to use some black chalk pastel instead of the charcoal pencil because it adhered to the paper and other pencil marks better and was better at minimizing the reflected light that comes from the darkest areas of graphite pencil. Rubbing in some pastel over the top of these graphite pencil marks dulls them making them blacker and much less reflective I only used this in the darkest areas because if it is over done you end up with a very different tonal quality. If over done you end up with a pastel drawing and not a pencil drawing but used sparingly it can be very effective, notice the neck and under the chin area, around the ear, as well as the pupils, and top lip. In the second stage of the drawing where I was doing the detail I changed pencil I was using for a Derwent 4B sketching pencil which is a very soft black and layers very well over the top of previously drawn pencil. I also used the battery operated eraser and a paper stump for blending the pastel into the graphite pencil and also blending the graphite pencil it into the white of the paper.

I also experimented with a Derwent 8B dark wash pencil which is a pencil that you can wash out with some water on a brush I tried this over some of the not so dark areas in an attempt to kill the reflected light that comes from graphite pencil marks. This did work to some extent, not as well as the black pastel chalk did but I could not use the black as these areas are not meant to be black and making them black would change the whole tonal quality of the drawing completely.

Pencil Portrait Drawing Equipment
HB 0.5 mechanical pencil, 3B graphite dust, a charcoal pencil, Jakar battery eraser, A3 300gsm water color paper, chalk pastel,Derwent 4B sketching pencil,paper stump, Derwent 8B dark wash pencil.

I succeeded in capturing the essence of Kurt Cobain and also managed to only suggest many strong features like the hair, creating a graphite pencil portrait drawing with photo realistic elements and also bold suggestive pencil marks. I am happy with the outcome as it now presents a better understanding of the 3 dimensional shape of the face giving me the possibility of further exploration and experimentation.

But…

My next victim will be, His Bobness.

Bob Dylan deserves to be immortalized in a graphite pencil portrait drawing if only for the fact that he has been on a never ending tour for possibly the last 50 years of his life, intentional or not that is a feat of endurance and lasting commitment.

View Gareth Pritchard’s profile on G+


Pencil art , drawing , things to know, equipment.

The requirements are pretty basic for doing pencil art, pencil drawings, but there are a few essential things you really need know in order to do well.

Here is an overview of the basic kit with a few extras you will need.

Pencil sharpeners.

I personally prefer the old-style two hole metal pencil sharpener.

A receptacle sharpener which keeps the wood chips contained within it is perfect for keeping things tidy.

To reduce wastage and breakage, especially with pencils where the cores are poorly centered, many people prefer using a hobby knife instead of a sharpener. If you choose to use a knife then please remember to be very careful and always cut away from yourself. If you use a lot of pencils often then many people prefer to use a good electric pencil sharpener.

Emery paper.

Very fine emery paper is useful for keeping the point sharp whilst you’re doing a drawing. It can also be used to clean your paper blending stump or Tortillon as they are often called.

Blending equipment.

A tortillon is a tightly rolled paper shaft that is used as a blending stump for smudging and blending your drawings. Use a tortillon instead of your fingers for blending as skin oils will damage your drawing in time, turning it yellow in the areas where you have been blending, making your drawing patchy and irregular, it also makes your pencil marks more difficult to erase if you need to.

Rubber tip ‘color shapers, pastel blenders can be very useful for working other media enabling you to work small confined areas. Chamois leather is sometimes used for applying, lifting out and mixing media.

Kneadable Eraser.

A kneadable eraser is very useful tool for lifting and erasing all types of media. When a surface of the eraser becomes dirty you can stretch and fold it into a fresh clean surface area. The general rule is to use large pieces for large areas and smaller pieces for small areas, you can also shape it to suite your needs. Many people prefer to use “Blue Tack” or similar adhesive poster gum as well or as an alternative.

Plastic Erasers.

Good plastic erasers will be soft and smooth to touch – avoid the cheap ones they are usually crumbly or hard and often come with advertising logos imprinted on them. Mostly it is best to have more than one on the go at the same time because they get dirty, needing to be cleaned often so having more than one means you can have clean ones available when you need them. It is best to have clean ones to erase the light areas and highlights, they can be trimmed with a sharp knife to make a clean surface but again please be careful. Battery and electric erasers are now popular and they enable you to make precise spot erasing and rapid clearance of large areas.

Ruler, T-Square and Flexible Curve.

Drawing a framework around your drawing area will help you with your construction so that that you can better place your subject in the drawing area it also helps for developing better comparison to help work a complete composition as opposed to having your subjects just floating on the drawing surface and creates a border around the drawing that will help when you might come to frame the finished piece. A T-square and straight edged ruler are both important for doing perspective drawings so it is helpful to obtain these in different sizes that are more applicable to the size of the drawing you are doing. A flexible curve is not important, but is often very useful when wanting to create smooth repetitive curves and more so when drawing subjects that have been manufactured and are expected to be perfectly drawn.

The graphite pencil as humble as it may seem is the simplest of drawing tools ever, yet it is unmatched even with today’s technologic advances, but when you visit the arts shops you will be amazed by the massive variety of these simple tools that come in many different qualities, shapes and sizes. If you are a beginner just starting out then a cheap and cheerful option might be best with the quick solution being to choose each of the following grades, 6B, 4B, 2B, H and 2H of fairly good quality. A serious beginner might want to buy a full set in a case or even buy a range of mechanical clutch pencils that can also be found in different sizes and grades, experimentation will help you find what’s best for you.

Line grooving tools.

Many artists use metal tools for drawing groves into the pager to create fine white lines by then lightly shading over the top with a pencil this creates very fine white lines because none of the pencil goes into the groves but some use hard plastic knitting needles as well and for very fine line work you can use a large darning needle with a fairly bunt tip.
What are pencils made from?

Pencil cores are made of powdered graphite (this is not lead as might be assumed because many people still call them lead pencils) the graphite is fired with clay, which varies in different hardness. A relatively soft, malleable type of graphite is used in a pencil which resembles lead and when first discovered it was mistakenly believed to be a different form of lead. Many people still think that pencil cores where once made of lead but they never where, graphite leaves small, smooth particles when used on paper and has a slight sheen because it is reflective.

Pencil Quality Varies.

Pencils can vary greatly in quality. Often the irregularities in substandard or badly processed graphite will lead to unpredictable varying tonal range, and even worse unintentional groves and scratches into the paper surface. Un-centered cores have a tendency to break when sharpening but the better quality pencils deliver a more reliable even tone with carefully graded hardness and are less likely to break.

Wooden-cased Pencils.

These pencils vary in hardness from about 9b (very soft) to a 9H (very hard) depending on brand and most in the beginning will start with a selection ranging from 2H, HB, 2B, 4B and 6B as these are more than sufficient. If you want to be doing extremely fine realistic tonal work then you will want to try the full range of pencil grades that are graded from 9H to 9B you could buy these in a full set but 4H is the hardest pencil I use.

Clutch and mechanical pencils.

Mechanical clutch pencils are very useful the traditional wooden cased pencils change their size, weight and balance as they are used and sharpened, which can be a problem where as clutch pencils have a regular constant weight, size and shape, they where once expensive but nowadays they can be bought very reasonably and the refill graphite sticks come in quantity which makes the even less expensive. They are environmentally friendly because there is no wood in them and they always stay sharp when working with small sizes. They come in a range of varying diameters from 0.5 to 5+mm I prefer these pencils to all others because they are very practical.

Graphite sticks and crayons.

Graphite sticks are thick solid graphite pencils that have no wood casing but have a coating on the outside for handling without getting graphite all over your hands which can be very messy they are helpful when going for broad, expressive work and shadows over lines made with a grooving tool or when wanting a visible paper tooth for a desired effect. Graphite crayons are chunky much like crayons are they are suitable for big, energetic work but they are messy as they have no coating on the outside so easily rub off onto your hand especially the softer grades but are the best for doing tactile, involved mark making on a large scale work or life drawing.

Powdered Graphite.

Powdered graphite is a more hands-on drawing medium, that is often applied with the fingers or a cloth that can be used in drawing to produce soft, loose marks it is also used to make a drawing surface toned for lifting with an eraser.

Carbon Blends.

Carbon pencils are made with carbon black or lamp black which is soot gathered from burning oil, giving it a smooth, very dark black line with variations on this being mixtures of carbons such as charcoal and or graphite. Particles vary in size depending what is the mix, soot has fine particle so is smooth and gives a nice even particle, charcoal is often quite rough. Compressed Charcoal pencils and carbon will be useful when wanting to obtain a true black, which is not possible with graphite because it is never black enough and reflective, always test the compatibility of application before doing your drawing.

Pastel and chalk pencils.

The black conte pencil is made from mixing carbon black and alumina chalk this has is smoother and creamier in consistency than the pastel, you can get hard pastels in pencil format, the manufacturers constantly experiment with the different media. Pencils which are white are either wax coloring pencils or chalk pastel pencils these are made from different combinations of mixed pigment, clay, chalk, gum and wax these other mixed media pencils may not always be compatible in pencil art, pencil drawings with graphite , and you should try them out first on a small test area.

View Gareth Pritchard’s profile on G+


Creative artists, creative process.

Creative artists, rule the world, if we think about it but we are not doing that, today because everybody should be able, to at least understand, the creative process and creative techniques we use, if you just keep on reading this simple explanation, you will.  Creative drawing is a pastime, that many people enjoy, all over the world and I am no different, it has been, so many things to me, throughout my life but one thing, it has always consistently been, is pleasure. The wonderful thing about drawing, is you only need, a pencil or pen, some paper, your eyes and your mind, in order to draw great pictures, a pleasure so easily obtained, it’s little wonder that many people enjoy it, the creative process is simple.

When I draw pictures, I often get lost for hours, fantasizing and dreaming to myself, about all sorts of imaginary ideas, concepts, stories or worlds, people, creatures and places, magic, and illusions. This is often the realm of creative artists, things that don’t exist, until you draw them and they are released from the imprisonment, of your mind, onto an unsuspecting world, it’s amazing, when someone looks at your work and says wow.

The creative artists and process.

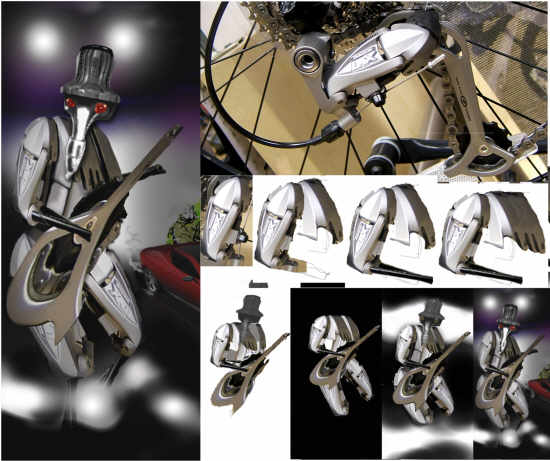
Below is an image of Gearman, he is an attempt at showing, the workings of how creative artists, with their imagination, create illusions from everyday objects, something I have done many times, when drawing because you can often see things, in other things.

Creative artists example of developmental stages when building an image from another image.
Image showing, the constructional stages of building an image, from another different images.

Yes, I know this is not, a creative drawing as such but is it, because it is not a photograph either, except for the, LX mountain bike gears, the rest could be considered a digital drawing, rather than a pencil drawing but in this format, it more easily shows the process, of seeing things, as other things.

If you draw pictures, any pictures, out of you imagination, from a picture or from life and you look, at what you are doing, you will start to see other things, this is not likely to happen at first because you will need, to build up visual memory from doing, a stock of past works, this is often called a repertoire. This is why, it is important to practice by doing drawings, all the time but if you like drawing, like many people do and you are a creative artist, it will not be a problem, as you will soon have a repertoire.

I want to tell you a little story, it is a bit of a dark story but a true story, all the same and also a good reason for understanding, a little bit more, about what I am trying to explain, about visual memory and creative artists.

I had a bit of an obsession, from when I was a small child, I wanted to be able to draw the human likeness, I wanted to be able, to draw portraits of real people, that looked like them. A large part of my young life, had been focused, on trying to do this accurately, so as others, would uphold my observations and confirm that I had, the ability to capture the human likeness, through drawing. I eventually reached the pinnacle of my success, in this, by drawing and painting portraits for people, getting paid by them for this work. During this time of about 3 years, doing portraits, I sold over a hundred of these, to the expressed wishes of those, I was drawing them for but I also drew many more, in the process, that I also sold, how many I do not really know, but in total, a couple of hundred. I was at it, all the time but it was causing me other problems, I discovered, I was so over exposed to faces, that I began to start seeing them everywhere, in everything I looked at. I seen faces in trees, bushes, the drawings I was doing, buildings, everything, it was fun at first but it soon became annoying, for me because I felt it was restricting my imagination, unless I was drawing faces.

I never wanted to be like that, I wanted to be able to draw faces, as well as cars, robots, landscapes, mountain bike scape’s or what ever but not just faces, and I had to stop.

I am glad I did, I don’t just see faces in everything, I look at anymore but, the only way to do this, was to stop and go back, to drawing anything but not faces, only when I needed them, for something else now.

This leads me to believe, that all creative artists, can hone their skills into a focused but restricted visual memory, by repetitively doing the same subjects, over and over, it seems to be a reason, why some of these creative artists, can draw from memory, without even looking, which is something I did not like because it felt like, my creative abilities where being restricted, to only one type of subject.


My new obsession, is to be able to draw everything and I am joking because I can do that anyway, so that’s what I do, we are all creative artists, developing a creative process, in every thing we do because that’s what humans do, when they focus their attentions on a task, this dose not just apply to drawing.

Easy pencil drawings.

This will explain about how to do easy pencil drawings.

Easy pencil drawings are achievable, if you break it down, into the two main components, of making a good pencil drawing, these are the construction or outline and the shading.

Most people find shading easier and more relaxing, than constructional or outline drawing but the problem is, you can’t do the shading unless, you have done the outline first. This makes drawing difficult, for most people and so they never get to enjoy, doing the shading because they give up, before they have completed the outline, and it’s a pity.

Easy pencil drawings, can be achieved, it dose not have to be difficult because you can trace outlines and get them right every time.

People will say, that tracings are no good, as drawings because they are uninteresting, if they are just tracings and boring. I will agree with this but if you are, then going to complete the drawing, by doing the shading, then this is different, very different. For a start, by learning how to do easy pencil drawings, you will enjoy, your drawing more. You will find it easier, you will find it more relaxing, you will create better drawings, you will not take as long, in doing it, plus you will still learn about construction and proportional representation, the easy way.

If you learn to draw, by doing easy pencil drawings, in this way, you will also improve, in all those more difficult areas, of construction drawing, that hamper everyone’s progress, when they try to draw freehand, by sight drawing, which is drawing, by just looking. Sight drawing is the most difficult way to draw, of all drawing techniques, so it is little wonder, most people say they can’t draw because everybody try’s to draw, by sight drawing, when they start out, it’s not a good idea really. The fact is that nobody draws, by just looking, even when sight drawing. Sight drawing is just, a more difficult way of tracing, all drawing is done by measuring, comparing and struggling to get it right, making mistakes, and trying to hide them or erasing them, making your drawings and pictures messy. Learn to draw by doing easy pencil drawings and you will find that, the results turn out to be much better and a lot less messy.

Let me tell you a fact, I used to spend hours, constructing outline drawings, of portraits for people and make a right mess, most of the time. Then I used to trace that drawing, to get the outline, onto a clean drawing area, to do my final drawing, I had no choice because people want copies of photographs, not drawings, that look like drawing, nowadays. Today people want, photo realistic drawings, they want them to look like photographs, not drawings and they do not want, to sit for you, either.

So I stopped doing it the hard way and started doing easy pencil drawings. I traced the outlines from photographs to save myself at least half of the work. I was told it was not good to do this but that was what I was doing anyway but taking twice as long. I was told, my other drawing skills, would diminish and I would become less able to draw, without tracing but do you know what, it is not true because it is more enjoyable, it is so much better but I still become aware, of important learning.

Below you will find a video, of me drawing Kurt Cobain, who was once the lead singer and guitarist, with the Grunge Rock band, Nirvana. Please notice that I am not tracing and it is here, just to prove, that tracing does not take away, from your ability to draw. Perhaps I am unique and it only works for me but I don’t think so, I am just like anybody else, who likes drawing, who got good at it, through finding ways to do so. I am sure you will also by doing easy pencil drawings.

The truth is this, I got better, much better because I enjoyed it, so much more, doing easy pencil drawings but I still became aware, of the important learning, as well.

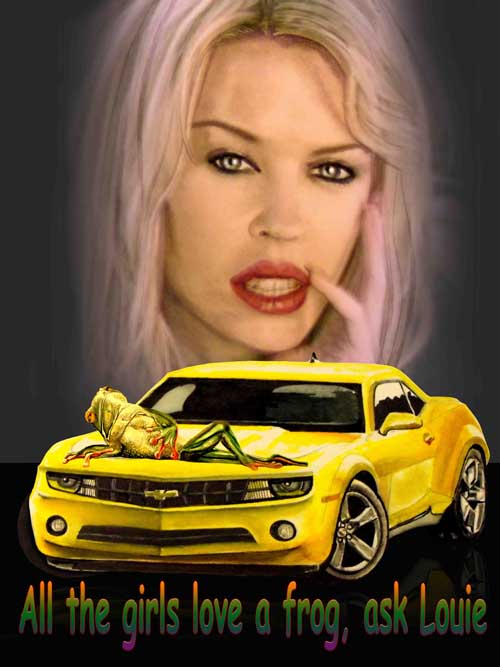
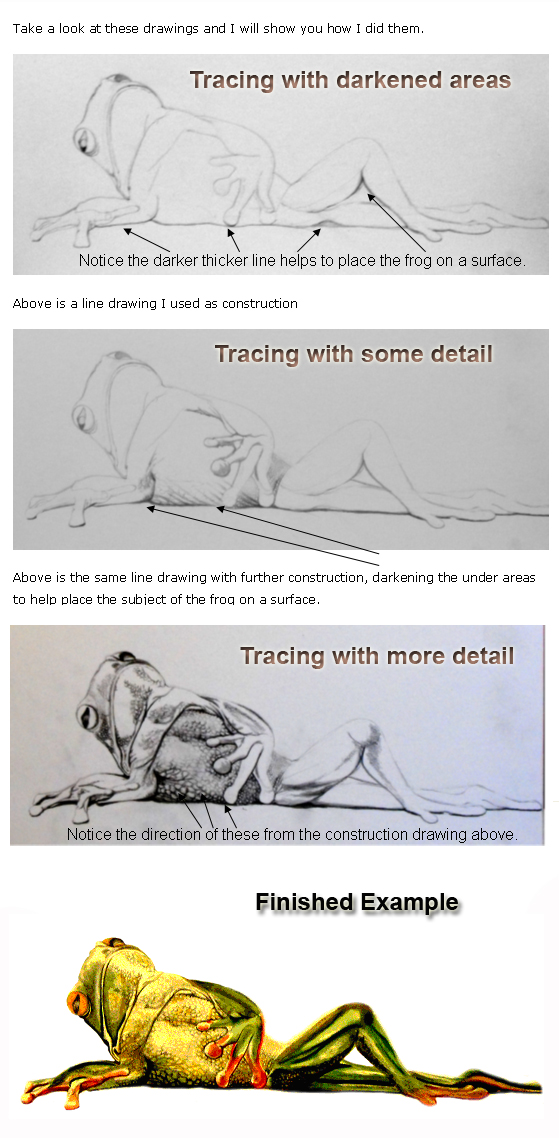
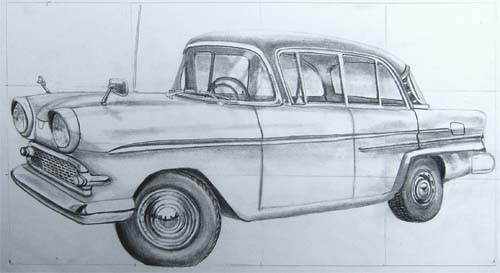
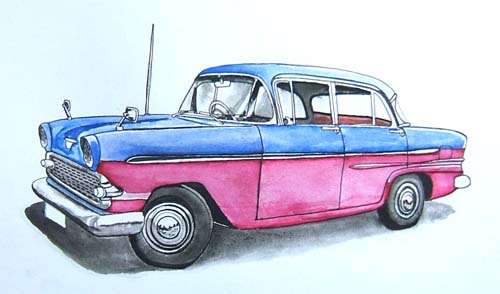
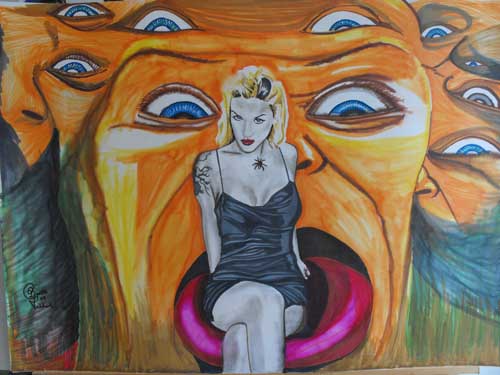
A picture of a car, a frog and a girl.
Louie, found on the Stumble Upon, website and lightly traced from my monitor screen.

Do you know what, you need to do easy pencil drawings first, then as you get better, you can develop, the other ways, that improve your sight drawing, when you understand it better.

easy pencil drawings a progresive drawing of a frog.
Easy pencil drawings, progressive drawings of a frog, tracing taken, from an image found online, to show you, how to draw easy.

How to draw easy, step by step videos, to help you.

Please find below some videos, that will inform you on how to draw easy step by step, using simple methods as always, except this might be just a little more time consuming but actually produces more accurate results.

It is easy to draw, if you follow the information in these first two videos which show you step by step how but most people will shrug them off,  saying that’s not drawing. What they don’t really understand is that, most of the stuff they want to draw and most of the so called experts doing drawing out there, in the big wide world, aren’t doing it the hard way like you think they are but are actually doing it the easy way.

The reason why they do it the easy way is because it is faster and anybody will tell you, that time is money, so if you take longer you make less money, that’s why they do it the easy way.

The easy draw method of drawing is used everywhere, by everybody in the drawing industry but the only people not doing it, the easy way are people like you but lets be honest, your not in the drawing industry are you? You might like doing it, you might be good at it but you probably don’t do it the easy way because most people think, it is too easy and don’t consider it to even be drawing. These people are wrong, yes they are wrong because if you want to learn how to draw, then doing it this way, gives you a lot of good practical information, teaching you how to do it well by informing your visual memory, at the very least.

Doing it this way, also helps you to practice other important drawing skills, like shading, in a much easier way and much more quickly, than doing it the hard way, in fact doing it the hard way, mostly teaches you how to get it wrong by not giving you the correct visual information in the first place, making it much more difficult because you have to, at some point, undo all the learning you have gained, about doing it the wrong way.

1950s Vauxhall Victor Grid Construction Drawing Showing The Grid Used.

1950s Vauxhall Victor Drawing, Painting With Water Colors.

The other videos, are about showing you, other more conventional examples of how to draw with marker pens and watercolors, they show you different ways to draw, and it is always best to be able to draw in as many different ways as possible. The first two videos, show you how to practice seeing and getting the correct information, right from the start, giving you a good strong foundation, to build your drawing skills on for the future.

Girl on tong maker pens and graphite pencil drawing see it on YouTube.
Girl on tong maker pens and graphite pencil drawing see it on YouTube quickfirsts channel.

Plus take a look at this for speed painting, which is a term I do not really like because it is not really speed painting, it is merely speeded up video, which is something quite different, although it only took me an hour and 17minuets in total.

These methods will help everybody to learn how to draw easy step by step, just like the professionals do, all the time because its more about money than art or drawing, when you are doing it for a living.

PS. my son made the music on the last video and it’s not half bad.

Thank you, Gareth.