Tag Archives: Elements

More drawing people rules.

The manikin is a great tool for drawing people or figures, it is a wooden doll, that can be set up to give you the basic out line, for a figure posing in any position and a great place to start any figure drawing, especially if you don’t have a real figure to draw from.

Images of a wooden manikin figures with one showing how a head can be used to judge proportion.
Image of a wooden manikins, used for figure drawing, when you don’t have access to a figure to draw from, showing how a head can be used, to judge proportion and measure size.

There are variations on how many heads tall an average man is, Leonardo de Vinci’s (Vitruvian Man) is almost eight heads tall where as I have seen statements saying that it is seven and half heads. The truth is this, if you measure the head of the person you are drawing, then measure how many heads it takes, to make up the distance or height of the body, it will be closest because most people vary in size anyway.

Doing this is how drawings are constructed, it is how they are measured for accuracy, mapping and recording from the information you gather, then regurgitating it into the next mark you make, to impress an idea in the viewers mind, even if the only viewer is you.

Drawing people as in the faces of people or portraits, are a very different story completely or at least they could be because I don’t use heads for measuring, when doing faces, I sort of use eyes.

The first thing you need to decide, is where you want the head to go on the drawing surface, so where does the top of the head go and where should the bottom go, in relation to the top?

You need to look at the face your doing from side to side, up and down, horizontally and vertically, whilst leaving some kind of marks behind on the drawing surface, to remind you next time around of where these elements go, in relation to each other. I look for markers, as to where the most prominent features go, on the horizontal and vertical plains, now I look where the eyes go and they are usually, half way down the head.

How far from the outer edge of the face, do the eyes start, horizontally and vertically where do the eyes start, on both sides of the face. The distance between an average persons eyes, is usually the same as the distance, from one corner of the eye to the other.

Now you can use this, to re check the other marks, from the outside of the face outline to where the eyes begin, you can use the eyes to also measure, the distance to the end of the nose, from the center point right between the eyes. This distance is usually one and a half times the distance of one eye, from corner to corner.
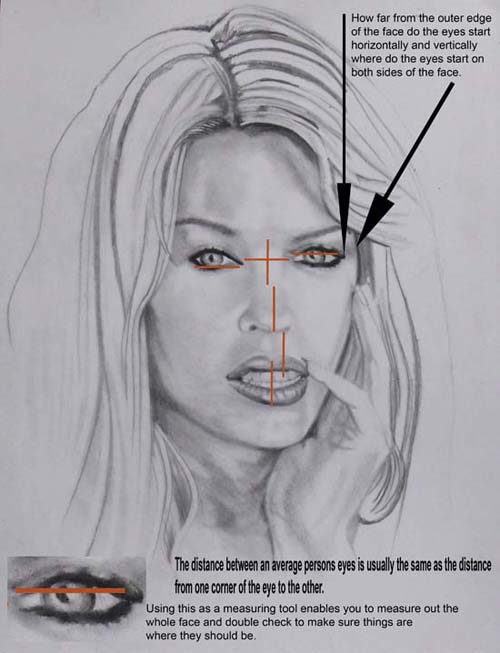
Image of a girls face showing how an eye can be used for drawing a face.
Image of a girls face, showing how an eye can be used for drawing a face, to help you to be more able to judge size, distance and proportions.

The distance of one eye, usually takes you to the bottom of the bottom lip with the mouth closed and the distance of two, and a half eyes, takes you to the chin, from beneath the bottom of the nose, so the eyes can help you see in more ways than one.

By measuring and checking in this way, you learn to look, and see like artists do or people who make drawings of people do, the most important part of drawing people, is the action of doing the drawing, if you don’t practice, you don’t learn enough.

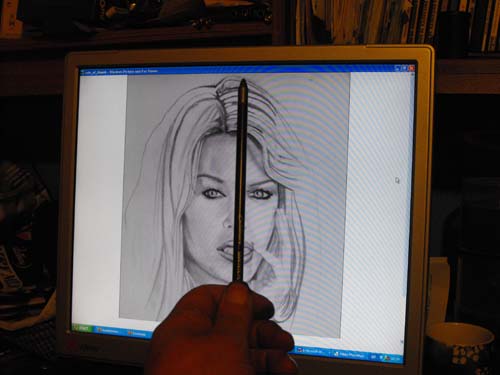
You can use the rule of thumb, when doing drawings from life by holding your arm out, at full stretch and measuring how many thumbs, equate to the size of the head, and check for accuracy in the same way as above, up and down side to side.

There are many other ways to construct drawings of figures, people or portraits, there is the grid method, where you use a grid over the top of your drawing,  that corresponds with a viewing grid that you look through.

If you are copying from a picture, you can use the outer edge of the picture, to use as a measure for reference points, these can then be used for transferring it onto the drawing surface, you can do this by drawing, the outline edge of the picture, onto your drawing area and draw construction lines, see the image below, for a better idea of what I mean.
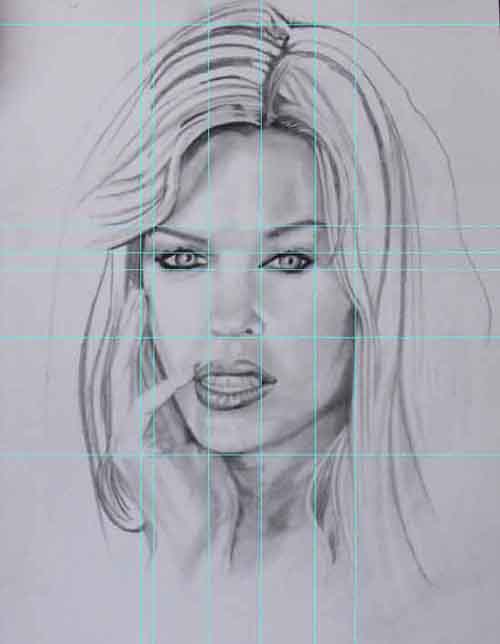
Image of a girls face showing grid lines to measure the proportions of the face.
Image of a girls face, showing grid lines, that can be used to measure the proportions of the face.

All this is a great way to learn about construction and sets the foundation for creating, great works of art, like the old masters did, and artists still do, because they use these, very same ways as building blocks, to then take the process further.

Michelangelo, Leonardo da Vinci and everybody else uses, there past work as a reference for creating further work, based on this body of work, that they create as they are also learning.

These guys where the ones getting paid for their work because they where revered, as having exceptional skills, that ordinary people didn’t have. When kings wanted something that was impressive, mythical, mystical or magic, to impress the popular culture of the time and still do to the present day, they used artists. The works of Michelangelo, Leonardo da Vinci are impressive because they have been used to teach this knowledge for drawing people, to others for hundreds of years.

Online drawing information.

Some suggestions about how you can use the same methods as the old masters, to enhance your drawing skills, with this growing resource of online drawing information, methods and skills, knowledge to enhance and develop your abilities.

How did the old masters like Michelangelo, Leonardo da Vinci, J W M Turner or John Constable do their great works, you might ask yourself, to which the answer would be that during the time they spent learning and honing in on their skills, they also collected a body of reference work? During this time they would have learned and practiced their skills but also this information would be used, as elements in future works, that they produced as they, would have also been compiling, a catalog of elements for future reference.

Mesurement using the rule of thumb.
Measurement using the rule of thumb is a great way the check your drawing is accurate.

This process enabled them to gather as much information as they could, through practicing drawing and painting to perfect their skills. They then used this information to compose compositions, of individual studies as a kind of collage, combining these elements, they had been collecting whilst teaching them selves to draw. They would also be drawing on previous learning and understanding but they would be doing this, the hard way as it was the only way to be able to do it, in those past times.

We are no longer confined to learning in just this way only and can reach the same standard of work, in a lot less time giving us much more time to be productive and effectively speeding up the process of learning to our advantage.

Do you really think, that if these former respected artists where familiar with cameras in their time, that they would not have used them because I would bet my life on it that they would, have explored them for every last drop of learning, that could be captured or recorded.

The problem with most modern day assumptions, about learning these same skills, is that they are entrenched in these same past methods of learning, that where the only means available in the times, that these past masters lived. These older past methods of learning, have now been fixed in stone and assumed to be the only way to learn drawing skills, yet although these are valuable learning experiences, they are also not the only ways, we have available to us today, online drawing information is improving all the time, please take a look around to find out more.

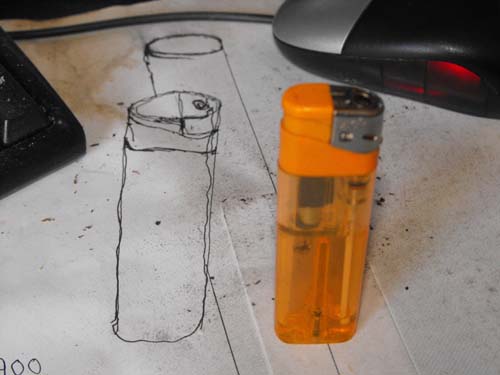
Anamorphic lighter drawing with drawing ink pen
Anamorphic lighter drawing with drawing ink pen drawn to look like it is standing up when looked at from this angle.

Two Point Perspective.

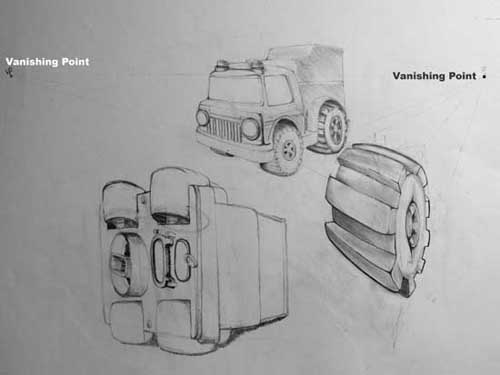
The two point perspective or linear perspective, as it can also be called, is a construction drawing technique that is made up of vanishing points, which are the points placed along an eye line or horizon line, as it is some times called, these are the elements that make up perspective drawings, like the ones below. Although the first drawing is quite nice, it is just made up of simple straight lines and curves, using a straight edge or line rule to place the guide lines from the vanishing points, it is much easier to draw perspective, when using these techniques.

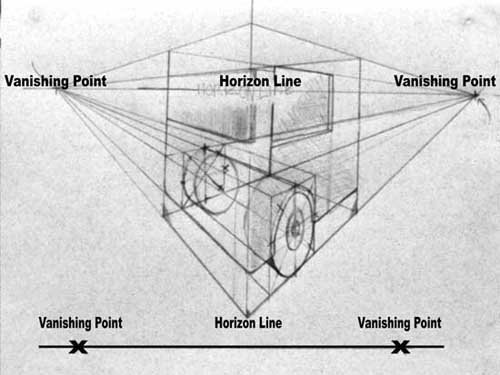
As can be seen in the drawings below, the horizon line or eye line, is just a horizontal line drawn across the page, to represent where the horizon would be or the place your eyes would be level with, when you are looking at some thing, by drawing all subjects in relation to this line, it creates the effect of there being distance in the image and between the object in it.

In the drawing below you can see the horizon line, vanishing points, construction box and perspective lines, that make up the 2 point perspective much easier and should assist you, in understanding how perspective drawing works. The vanishing points create the points where an object would taper off into the distance, to create the impression of something being three dimensional and this technique is sometimes called, true perspective as well as linear and two point perspective.

The horizon line and vanishing points are used to construct boxes, to use as guides and enable you to draw an object that looks like, objects in life that taper off into the distance, the best way to see this is by looking down a long street, where you can see the building close by above your head but the further into the distance, they go the smaller the further away they become and the road also gets smaller, another example can be seen on railway lines, when you look at them, they seem to meet in the far off distance.

Image of two point perspective drawing.
Image of two point perspective drawing of a child’s toy.


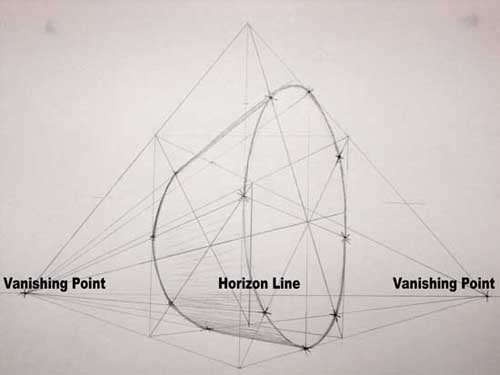
In the image below, I have drawn a wheel type shape in a box, to show how the same effect can be created with circular objects like wheels but I have also used, a very low horizon line, to give the impression of looking up at something, making it seem very big and above your head, even though it is just a simple drawing on piece of paper. There are lots of ideas you can create when you draw perspective and these types of drawings, always look dynamic, giving a great deal of impact to any drawing, so it is well worth experimenting with this 2 point perspective technique.

A two point persective cube image.
The horizon line has two points from which to draw perspective in this example.
Image of a big perspective
A big perspective with a low horizon line giving the impression of looking up.

The horizon line has two points from which to draw perspective, in the above example.

A big perspective with a low horizon line, giving the impression of looking up at something, can be very impressive, expressing an image of power and dominance.

You can do this with a single, one point perspective or two point perspective, as well but the single point is a little limited because it often only works well, when looking at something directly from the front.