Tag Archives: Piece Of Paper

3d drawings, anamorphic secrets revealed.

3d drawing secrets.

The secrets of anamorphic 3d drawing and the amazing 3d drawings of street artists are no longer a secret any more. Follow the information contained on this page to reveal how it can be understood using a reference grid.

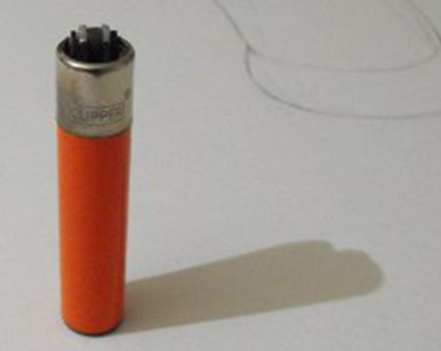
The video below shows a clipper lighter standing upright, nothing unusual or outstanding about that. The problem for many people, is to understand how it can be drawn to look like it is standing upright on flat 2d piece of paper. The secret of 3d drawings used by street artists that you need to know, is how to create the anamorphic illusion. If you know how to do this then it is not a problem. This is for those who do not know and would like a better understanding of this illusion.

Please see the video below to see this in action.

An example of a Clipper Lighter standing upright to be used for our 3d drawings.
A Clipper lighter standing upright to be used as an example.

3d drawings using a camera.

Most street artists when creating these anamorphic 3d drawings use a camera to aid the process and describe their technique as drawing by eye. This means they are drawing by looking and using the camera as a guide for doing so.
GIMPed pumpkin head.
Don’t be a pumpkin head get GIMPed.

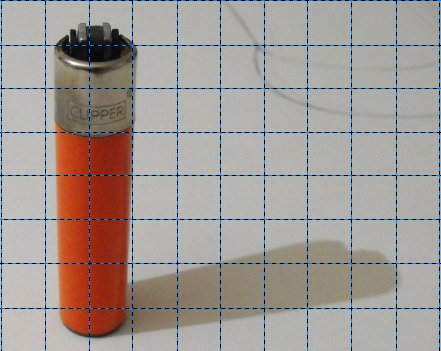
In the image below a grid for reference has been drawn over the top of the lighter image and it has been cropped using the free GIMP photo editing software. Many artists use reference grids for getting their construction drawing accurately draw. This can be easily done using a pencil and straight edged ruler. If you don’t have access to photo editing software you can do it by using a print out of the image.

Clipper lighter with grid for taking 3d drawings from.
Clipper lighter with reference grid placed over the top for aiding our 3d drawings.

Using a camera viewing window to do 3d drawings.

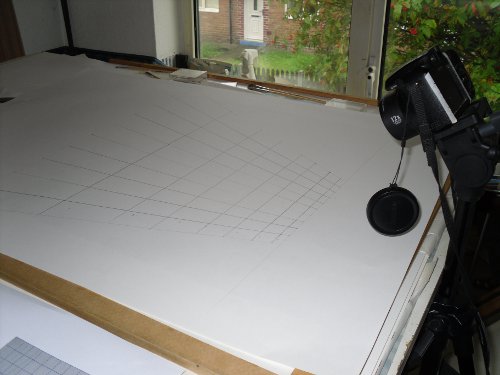
The grid was drawn onto a piece of A1 cartridge paper to replicate the grid in the image above but as can be seen in the actual drawing, the grid drawing is far different from what can be seen through the camera lens. Notice that the grid drawing gets wider and wider, the further away it is from the camera. This is because of distance, indicting that the further away the object is, the bigger it needs to be in order to compensate for that distance.

The secret to these 3d drawings is realizing that this is what makes the technique work, being able to compensate for distance.

View of the camera in position and 3d drawing grid.
View revealing the position in relation to the camera of the drawing area and 3d drawing grid

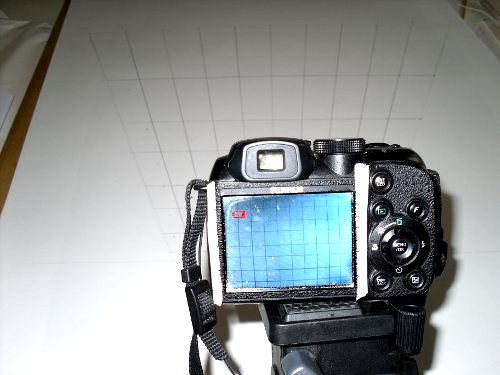
Below is an image of the camera showing both the drawing of the grid and the image, as seen through the camera lens, showing the difference between both. In the camera viewing window the grid looks like it is made up of squares. Where as the actual drawing isn’t made up of squares at all. This enables us to see how the camera lens at this viewing plane is distorting the drawing. Thus making it seem like it is made up of squares, when it is not. It is actually the same as any other perspective grid used to draw 3d drawings, that would be drawn to depict an object as if being looked at from the top. With the bottom tapering off into the distance as will be shown the the next image below this.

View of the reference grid drawing and what it looks like through the camera lens.
This image shows a view of the reference grid drawing and what it looks like when looking through the camera lens

Notice the two strips of masking tape placed down each side of the camera viewing window on the camera. These have been marked out with with lines equal in measurement. Using these measurements down the side of the viewing window of the camera, helped me to draw the grid. Using them as guides to see where to put the marks on the papers drawing surface. This was only necessary for the horizontal lines of the grid. The vertical lines can be measured after you have drawn the horizontal lines. This can be done by dividing the top and bottom lines by ten as in this example but this will depend on how many squares you want in your 3d drawing grid. The more squares you have in your grid to make 3d drawings. The easier it will be to complete your end drawing.

The secret of 3d drawings using a camera technique like the preferred choice of street artists.

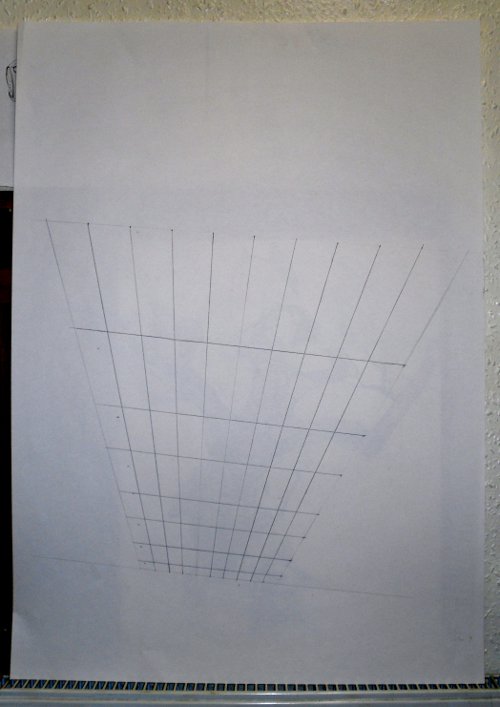
In the image below you can see what the reference grid actually looks like when viewed from the front as you would normally. Please take notice of how the grid is wider at the top than the bottom. Also notice how the squares have become elongated and the horizontal lines are further apart as they get closer to the top of the paper. This image below shows what a perspective 3d drawing grid might look like if it was being used to draw an object, such as a building being viewed from above.

Anamorphic perspective grid for doing 3d drawings.
Anamorphic perspective grid for doing 3d drawings viewed directly from the front.

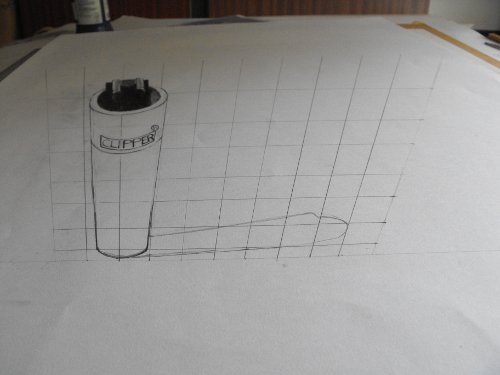
In the next image below I have drawn the Clipper lighter using the perspective grid for 3d drawings as a guide to accurately draw the lighter at this distorted perspective. Also notice how it can be seen in the camera viewing window. Notice how when looking at it through the camera viewing window it can be seen as a Clipper lighter standing up right and how the drawing grid also seems to be made up of squares.

3D Drawing Through Camera Lens Showing Lighter And Grid Showing Visual Plane.
3d drawing of the lighter through the camera lens, this is showing the lighter and reference grid at the correct viewing plane for comparison .

The image below is a photograph of the 3d drawing, showing further how it looks just like any other drawing of a lighter standing upright. This gives you a visual demonstration of the optical illusion created by the anamorphic 3d drawings perspective and the focal plane of the camera.

3d drawing of the anamorphic perspective grid and Lighter
Anamorphic perspective drawing at the correct photographic angle and position as photographed with the camera.

The next image has been photographed slightly out of position and not at the correct focal plane. This enables you to be more able to see what it looks like in reality. It is revealing the distorted 3d drawing showing how it is much bigger at its furthest point from the viewing position.

Anamorphic Perspective Grid Drawing Not Sited with Camara Corectly.
Anamorphic Perspective drawing lying on drawing table showing its two dimensional attributes because the camera is not correctly sited.

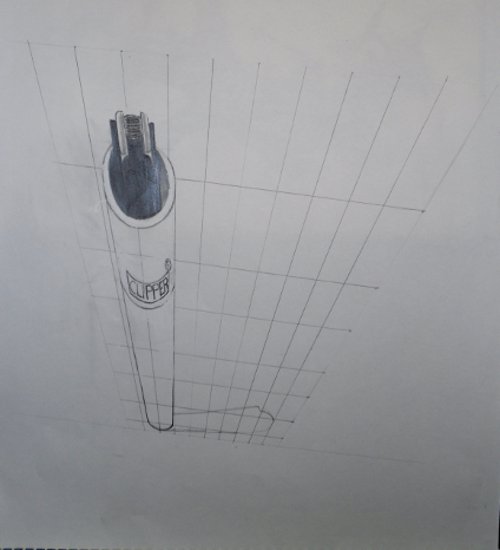
Below you will find two more images to show what this drawing really looks like, when viewed as you would normally, the first one is the right way round and the second is being viewed, the wrong way round. Taking a look at these gives a better understanding of what the secret really looks like and helped me to visualize the distortion created by this unusual illusionary effect in the technique of making 3d drawings.

This image below is being shown the correct way up and is viewed from the front as you would any other drawing or image, directly from the front. It clearly shows how the drawing is distorted with the top being much wider than the bottom.

3d anamorphic perspective drawing with camera not correctly sited.
The 3d drawing of the lighter as viewed directly from the front showing it as it would be viewed when not looking at the correct angle.

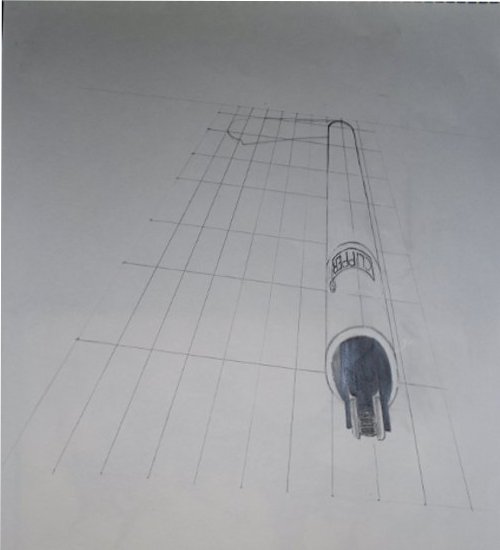
The image below has been turned up side down and reveals that looking at it this way around presents an image that resembles a perspective grid for depicting something that is tapering off into the distance. This is because that is what it is and would be doing. If something is close it will be big and as it gets further away it will get smaller, and smaller, the further into the distance it gets.

3d Anamorphic Perspective lighter Drawing Upside Down From the front.
The same 3d Anamorphic drawing from the front but turned upside down it gives the impression of any normal perspective drawing, creating the illusion of distance.

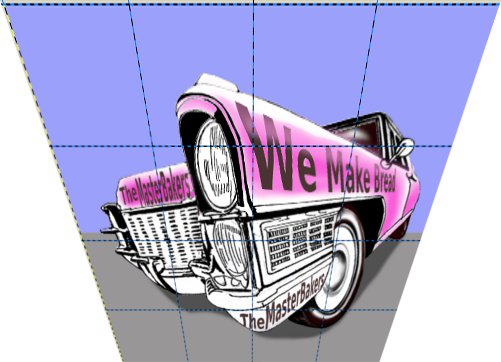
These 3d drawings can be created on a computer using GIMP photo editing software or any other photo editing software if you can distort images with a perspective tool. I found that if I took an image and placed a reference grid over the top of it on a separate layer in GIMP. Then merged both layers together and distorted it with the bottom being half as wide as the top, it created a good example of a drawing grid and picture combined. It produced an image that could be viewed with a camera to make it look like a normal image as shown in the example below.

Cadillac 3d drawing viewed through the camera lens.
Cadillac distorted 3d drawing, viewed through the camera lens at the correct visual plane.

It can easily be traced from an A4 sheet of printing paper.

3d Cadillac Drawing Distorted Image.
This image could be used for tracing as the outline for drawing a 3d anamorphic perspective

This image below is the actual photograph of the distorted image taken with the camera it is the result of this photo manipulation technique to create 3d drawing on the computer for close up viewing with a camera.

Cadillac Image taken with a camera of the distorted image above
Cadillac Image taken with a camera of the distorted image above, to show as an example

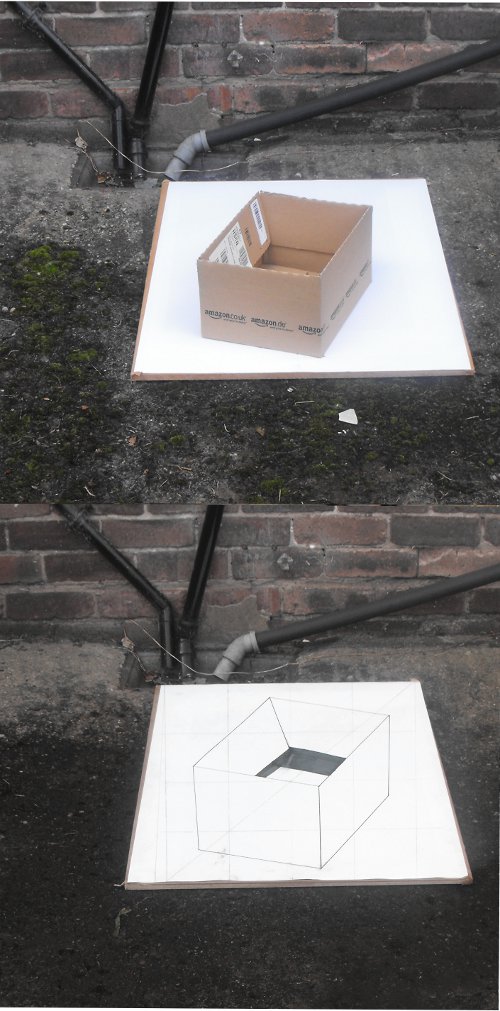
Then there are some images below this, with shots taken at a distance of about 10 feet, 3meters, of a box placed on a sheet of A1 cartridge paper. This is more closer to the working distance experienced by street artists doing, 3d drawings on the street.

3d drawing and box comparison.
3d drawing of box in comparison to the original photograph of the box in the correct position.
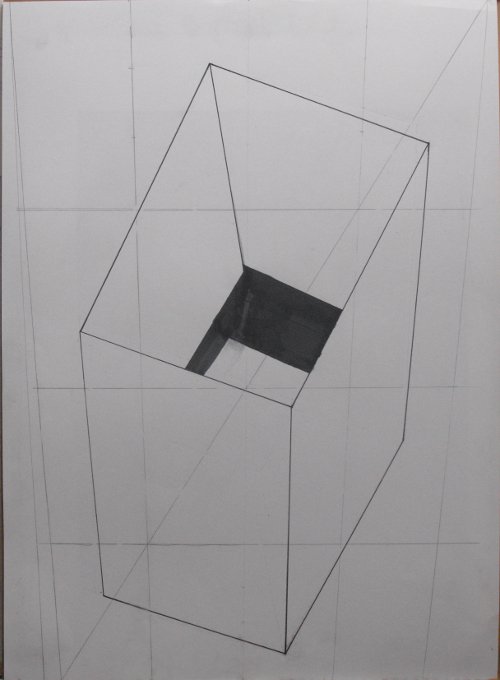
Image of 3d drawing of box.
The actual 3d drawing of the box when viewed from the front and showing the reference grid lines.

http://en.wikipedia.org/wiki/Anamorphosis

View Gareth Pritchard’s profile on G+


How to draw graffiti easy.

How to draw graffiti, the first step you need to take, is deciding, what you are going to write, are you going to write, your name or are you going to give yourself a handle, like many graffiti artists and writers do, all over the world, all of the time. If you want to get a better understanding of, what a handle is, then you can, by following this link to graffiti creator,graffiti art.

Now take a sheet of paper and write your name or handle on it, with a pencil, the way you would normally, write it and have a look, at how you write it. Write it again, only this time make it all capitals letters, with plenty of space between them, now try writing it, in as many different ways, as you can think of and don’t worry, about the end results, it is only the start of a process.

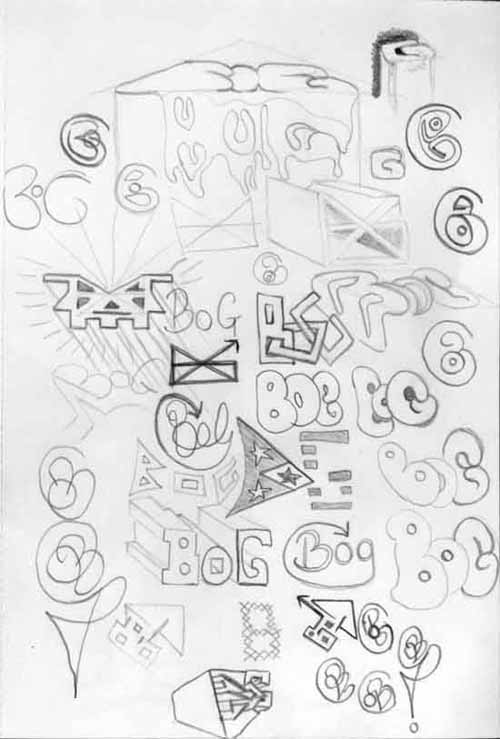
Please see my example ideas, design sheet, below.

3D graffiti design sheet of ideas drawn with a 3B graphite pencil.
3D graffiti design sheet of ideas drawn with a 3B graphite pencil, cool anybody can do this.

As you can see, I have used different types of letters, curved ones, square linear type letters, boxed, three dimensional letters and some, that are hardly readable as letters at all, the more you create, the better. If you find yourself stuck, after only drawing a few, then look for some ideas, in the news paper, a comic, magazine or anywhere, you might find ideas for lettering.

When you are happy, that you have generated enough ideas, then you can look over them and pick out one or two, that you like, for further development, it can be as many as you like, not just one or two, if you like them. Now, redraw these out on their own, in the center, of a clean piece of paper, try to fill the paper, as much as you can and make these drawings, more accurate, correcting or altering, anything that needs it, as you go. Try to keep your lines faint and not too heavy because they will be harder to cover later.

You can also look online, for lettering and graffiti art because there is an abundance of it, even videos that show some fantastic work, with it all being, a great source of ideas and inspiration.

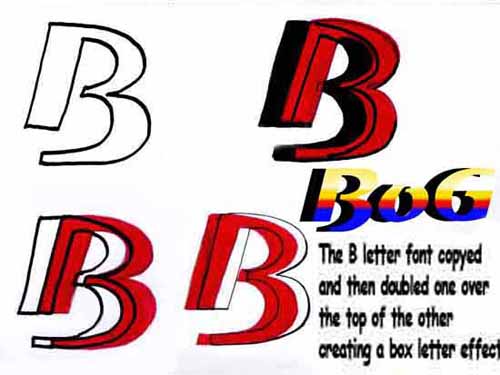
You can create block lettering easy, by just redrawing your letters, over the top of each other, again but out of line, like in the example below.

You could trace your name or handle and then move it a little, to the left or right, up or down and retrace it, over the top, then fill in the area, where you can still see, the first letter outline in black, to create the illusion of shadow.

You can also overlap letters, so the second is hiding, slightly behind the first and the third behind the second, to create the illusion, of one being in front of the other, this overlapping, is a very common feature, in graffiti art.

Please see the example below, to understand this a little bit more, in a visual context.

An example of 3d box lettering using outlines over the top of one and other.

Notice the black shadowing, created by moving the letters, up and the black outline, around all the letter shapes, you can also see that the colors have been added, any old how but are still effective because of the, well defined black outlines.

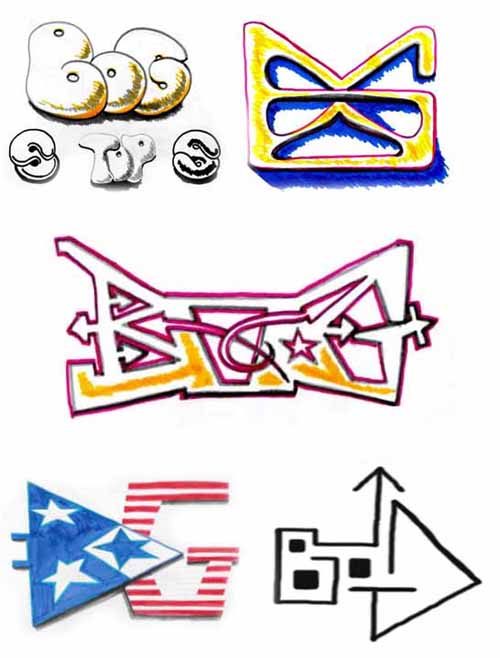
Now you can take some of your original ideas and try some of this, with them, below you will find some of my designs, taken from the first sheet of simple pencil drawings.

3D lettering example of how to use letters doubled over the top of each other to make box letters.

I have added color and black outlines, which is something you should now be trying, with your own designs, you could try many different combinations of color or black outlines, you could even try, colored outlines.

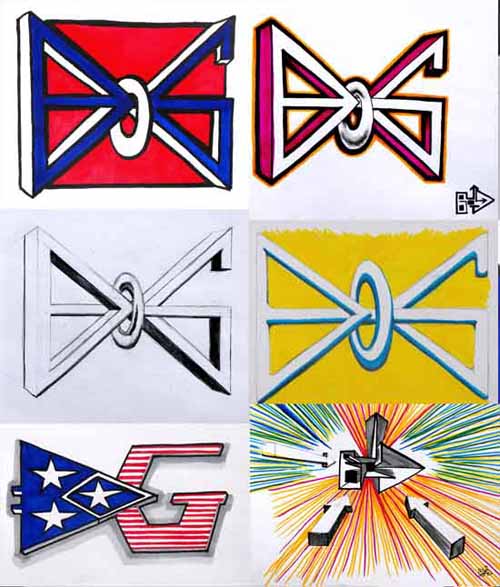
Now you can, further develop one idea and try it, as many different ways, as you can think of or combinations or color, see the examples below, for further development of ideas.

Images of earlier examples that have been further developed.
Some of the earlier examples that have been further developed.
Images of further development graffiti letter ideas.
Examples of further development with graffiti letter ideas.

The tools I use:

Paper or drawing pad, A4 printer paper is good and not very expensive but pads are better, you can carry them around with you, if they are not too big.

Soft graphite pencils, preferably mechanical, pop a point type pencils, 0.5, 3B, if you can get them.

Fine line permanent ink pens, 0.5 and Biro’s, in different colors.

Permanent marker pens, the more colors, the better.

Water soluble felt tip pens, the more colors, the better.

Colored pencils in various colors.

Quarter inch, flat brush and water.

Learning how to draw graffiti, is not difficult or hard and you can get, very good, very quickly, if you put a little effort in to it, honest.

Hand drawing.

The hand is a remarkable tool, worthy of taking the time, to do some close observation by making some, detailed, hand drawing studies. If you are interested in the figure or drawing people, then it is important to study the hand in detail because it is also, an important aspect of human interaction and communication. The hands, have a great deal to say without words but through gestures, they can often convey many different meanings and are an important element, of visual communication, along with body language.

Research shows that none verbal signals, carry about five times as much impact, as the verbal channel. Hands play a significant role, in this none verbal communication, so if you are drawing studies of the figure, it is important, to have some understanding, of what the hands might have to say.

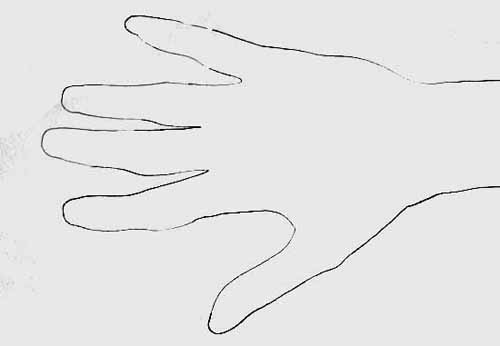
If you want to start understanding the hand, more closely, then you could place your own hand, palm down on a piece of paper and just draw around it, to start out with, now take a look at the shape without any detail.

Basic outline of hand showing no detail.
Basic outline of hand, showing no detail.
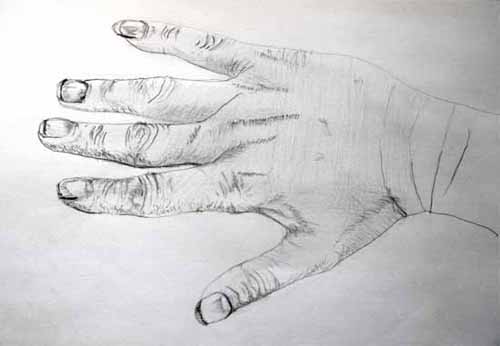
Image of a hand with more detail using hatching methods of mark making mostly.
Same hand but with more detail, using, hatching methods of mark making, mostly to further define, shape and form.

Now you could draw your own hand again, with more detail this time, it will enable you to observe it more closely and understand the shapes, and form better.

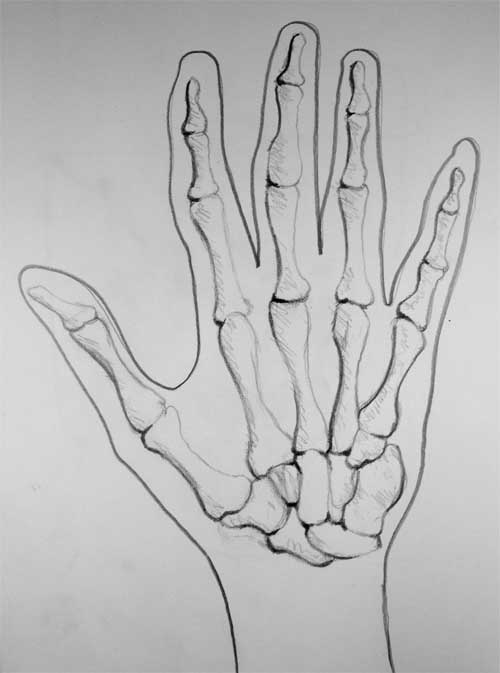
Image of hand showing bone structure in some detail.
The hand showing bone structure, in some detail, Phalanges, Metacarpals and Carpals, that make up the different bones in the hand, and part of the wrist.

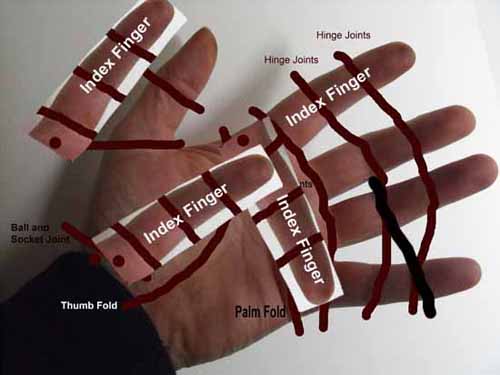
The body of the hand or the main bulk area, is about the same length as the index finger, from the knuckle, ball and socket joint.

Hand diagram image of important features
Hand diagram, image of important features to understand.

Notice that the index finger, is similar in size to other areas of the hand.

Hand image showing how the index finger can be used to understand the proportions better.
Hand image, showing how the index finger, can be used to understand the proportions better.

If you place your hand over your face with the tips of your fingers near the hair line and the part of your palm, where it connects to your wrist, at your chin, you will notice, if you look in the mirror, that your fingers start, just below your eyes. This means that the distance, from your chin to just below your eyes, is the size of the main body area, of your hand from your wrist, to the start of your fingers. Multiply this by two and you have the size of the whole hand, from the wrist to the finger tips.

Because of the fact, that there is as much information, to be noted in the hand, as there is in the rest of the human body, it is worth understanding why and also realizing, that they are often just as difficult to draw.

The hand consists of four fingers, a thumb and the main body area, being the palm.

The human body/figure, consists of two legs, with similar joints as the fingers, two arms and a head, so both have, a similar number of corresponding elements, that make both hand drawing and figure drawing, near equal in difficulty.

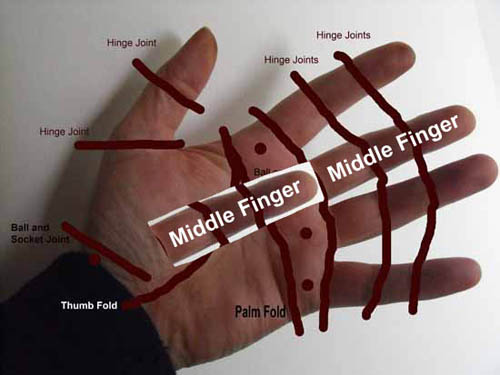
Hand image showing how the middle finger can be used to understand the proportions better.
Hand image, diagram showing, how the middle finger can be used, in comparison to understanding, proportional sizes better.

For further information on hand drawing, please take a look at this video, on YouTube, How to Draw a Hand (With Spoken Explanation), Mark Crilley, manga creator, of ‘Miki Falls’  presents a tutorial, on how to draw a hand, paying close attention, to getting, the general proportions right and giving another well presented, overview of the main characteristics.

Hatching, cross hatching and tonal modeling basics.

Hatching, cross hatching and tonal modeling basics, will help you understand shading techniques, this understanding I am going present will further enable you to develop your drawing skills, by using these simple methods.

A very basic explanation of tonal modeling is as follows.

If you draw on a piece of paper with a soft, 3B or 6B graphite pencil and make a dark line by pressing hard, then rub over the top of the pencil line, with your finger or with a piece of paper under your finger, you will see that line you made has now been smudged. Now the line that you made, will not be as well defined with the edges of it being softer and less definite or hard. This is known as a tonal modeling technique, one method of creating this tonal modeling technique is by smudging the pencil marks used for shading, to help create a more realistic three dimensional form. This is not the only way to do your tonal modeling or shading, as it can also be achieved by rubbing the pencil lightly over the paper to create a soft blended tone also.

There is also another shading method called hatching and cross hatching as well that we will explain a little later in this article.

Tonal modeling is when the pencil marks are modeled or smudged, so instead of them having hard edges, they have soft blended edges, this smudging can be done using your fingers, a paper stump, soft tissue or cotton wool. Using your fingers is not recommended because of the oils from your skin, that contain acids being left on the paper, these oils with time can cause discoloring and rotting of the paper, ruining the finished drawing, over a period of time.

When a sculptor models with clay, he creates the shape and form of the sculpture by modeling the clay with his hands, tonal modeling is when you model the pencil marks to create soft blended tones of graduated shading with a pencil, charcoal, pastel or paint, it is a process of blending tones or colors, so there is a soft graduated transition from one tone or color to another.

Tonal modeling in a drawing or painting context, is when the pencil, charcoal, pastel or paints are blended to create soft shadows, to produce the form and shape of the object, being drawn on a 2 dimensional surface creating the illusion, of a 3 dimensional form or shape.

The blending of the drawing materials, into graduated tones to create the illusion of a 3 dimensional form or shape, on a 2 dimensional drawing surface is what’s usually referred to as tonal modeling.

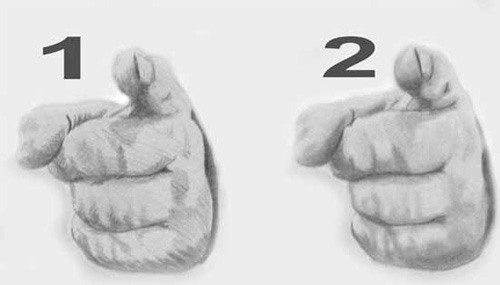
Below you will find an image of two pencil drawings.

1.    This first image has been drawn with a 5B graphite pencil, using a hatching and cross hatching method.

2.    This other second image, has been drawn with a 5B graphite pencil, using a tonal modeling method.

Example of hatching and tonal modeling.
The two methods as example, cross hatching and tonal modeling.

Both depict the shape and form of the image but the second example, is modeled, using the tonal modeling method, notice that the shadows and tones are soft, with few hard edges, unlike the first cross hatching example, with many hard edges/lines.

Essentially there are hatch marks and smudge marks, with both these types of marks having attributes, also associated with the use of charcoal, that enable you to learn to understand tonal variation better.

•    Both types of marks are good and effective in their own right, as well as when used together.

•    Both make excellent drawings, in their own right and when mixed.

•    Both can have specific, common and preferred uses.

•    Both are also used when painting.

•    Both can be used effectively, with other types of drawing tools, especially the hatching marks.

Modern mark making revealed again.

Crosshatching and tonal modelling.

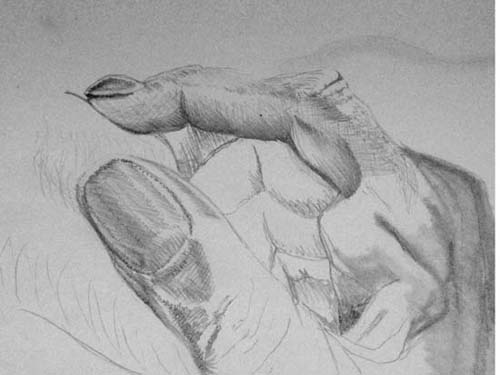
Pencil drawing photo image of a thumb and finger.

The above is a combination of hatching, cross hatching, line drawing and tonal modelling with only a HB pencil being used to do this.

Crosshatching and tonal modelling.

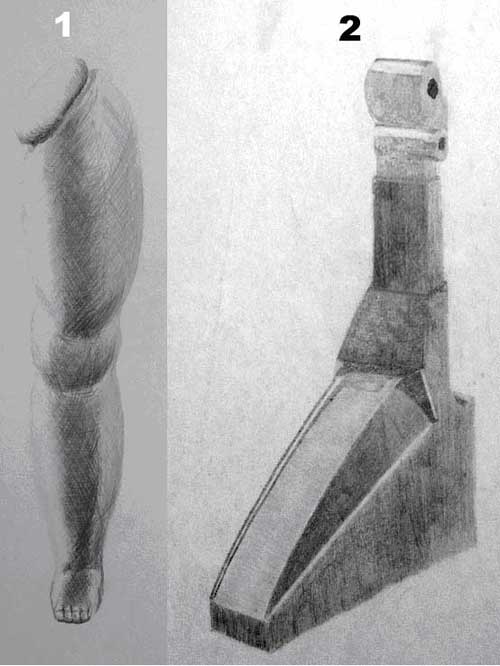
Example of two different mark making techniques, cross hatching, tonal modeling.

  1. Cross hatching style drawing, of a dolls leg but although very messy looking in the detail, it is a fine example of how, even soft flowing shapes can be created with crosshatching.
  2. Tonal modelling or blended style, with very hard edges, although you can see some of the hatching marks showing through as well.

Hatching and tonal modelling revisited.

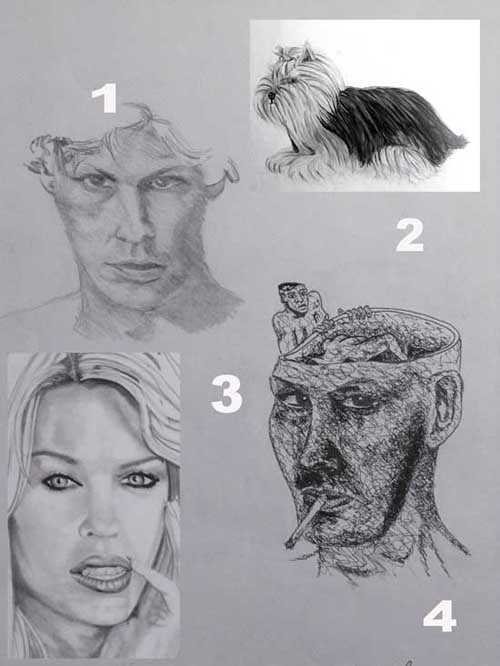
Example sheet showing different types of mark making.

  1. Example of a loose tonal modelling or blending style drawing, of a face that is really somewhere between, hatching and tonal modelling because of the even marks, slanting downward to the right.
  2. A Yorkshire terrier dog, which happily lends it’s self well to this loose but flowing hatching technique, which is highly appropriate for drawing fur or hair, as can be seen a little in image 3 as well.
  3. A soft blending of tones creates this portrait, this is mostly achieved by smudging the graphite pencil marks, with a paper torchon or drawing stump, this is just a hard paper pencil type tool, that can be used to smudge the pencil marks.
  4. Although some like to call this a squiggle or squrkle technique, it is actually just another form of cross hatching, this image has been drawn with a permanent ink pen.

View Gareth Pritchard’s profile on G+
 

Single point perspective drawing.

The single point perspective drawing, is made up of a vanishing point, on the horizon line, where all construction lines, converge to give the impression of the object disappearing into the distance, as objects do, when we look at them in real life, this enables us to give our drawings, the impression of being three dimensional. Many illusions of depth, can be created by doing perspective drawing and most people find it very interesting, to do this type of drawing, in fact many people spend hours doing it because they can easily create, very dynamic 3D drawings, that look impressive.

How to draw perspective, using a single point, the most basic single point of all, can be done by putting a single dot or point, in the center of a piece of paper and then drawing perspective lines, from the center to the out side of the paper or drawing area, this then creates a single point perspective, if everything is then drawn in relation to these lines, it creates, the illusion of things, getting smaller, as they lead off into the distance, like they do in real life.

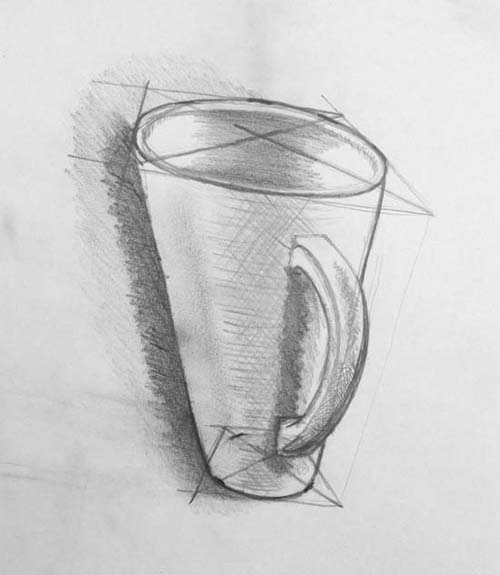
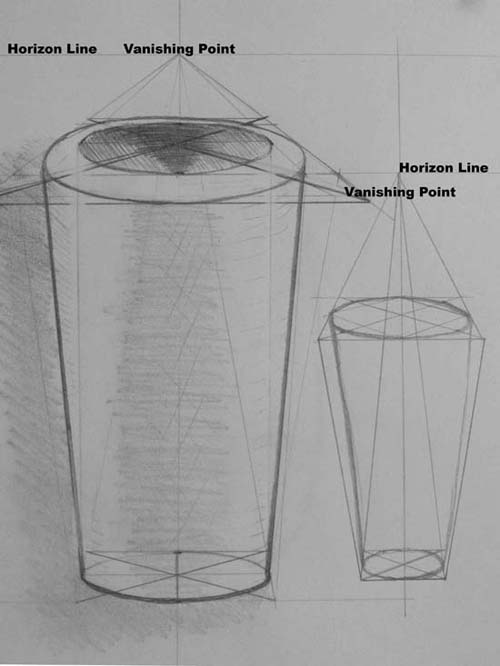
The drawing below, shows a distorted cup drawn in single point perspective, the cup looks distorted because the construction box, at the top and bottom, are on a slight angle, slanting down to the right, making it seem distorted.

In the drawing further down the page, below, the construction boxes are drawn head on and the horizontal lines are drawn, fairly accurately spaced out from each other, top and bottom making the shape, seem correct and not distorted like the cup drawing directly below.  The other aspect of this drawing, is called an ellipse, which is the oval shape, made by circular objects, when looked at in perspective, this can be created by following the explanations in the drawings.

A single point persepctive drawing of a cup.The drawing below shows a more detailed explanation, of how to draw ellipses in single point perspective, the basic formula for this type of drawing is made by using an horizon line, which can also be called the eye line. The horizon line is mostly, just a horizontal line drawn across the paper, where your eyes, would be level with, when looking at the object and the perspective point, would be placed on this line so everything in the drawing, would converge on this single point, creating the illusion of perspective.

Single point perspective drawing with ellipse.

How to draw an ellipse in single point perspective.

Information sheet, how to draw an ellipse in single point persepctive, diagramatic.

The humble graphite pencil is a great tool to use, as a first place to start because of the many, cool effects you can develop and implement into your drawings with it, like mark making, notice the different types of shading in the drawings above. There is a combination of tonal modeling, hatching and cross hatching, which are the main types of mark making used in most drawings.

Also the graphite pencil, is probably the easiest tool to get your hands on, for doing drawing of all kinds, including the single point perspective drawing, like in the examples above.